WebAssembly and Containers with Docker Desktop - Hello World & Beyond
On top of being the runtime for containers, Docker Desktop is also able to run WebAssembly (Wasm) workloads. In this article, we’ll explore how one can run both containers and Wasm workloads together to build distributed architectures using the best of both worlds.
Beta Feature: Wasm workloads in Docker Desktop is currently marked as a beta feature.
- What we are going to build
- Prerequisites
- Activate Wasm Workloads in Docker Desktop
- Hello World - The Wasm in Docker Desktop edition
- Orchestrating the Sample Application
- Conclusion
What we are going to build🔗
Discovering new topics, or learning emerging technologies often goes best when looking at a practical example. For the sake of this article, we’ll start with a simple Hello, World. From there, we’ll move on and orchestrate a simple three-tier application consisting of two containers (frontend and postgres) and a Wasm module (api).
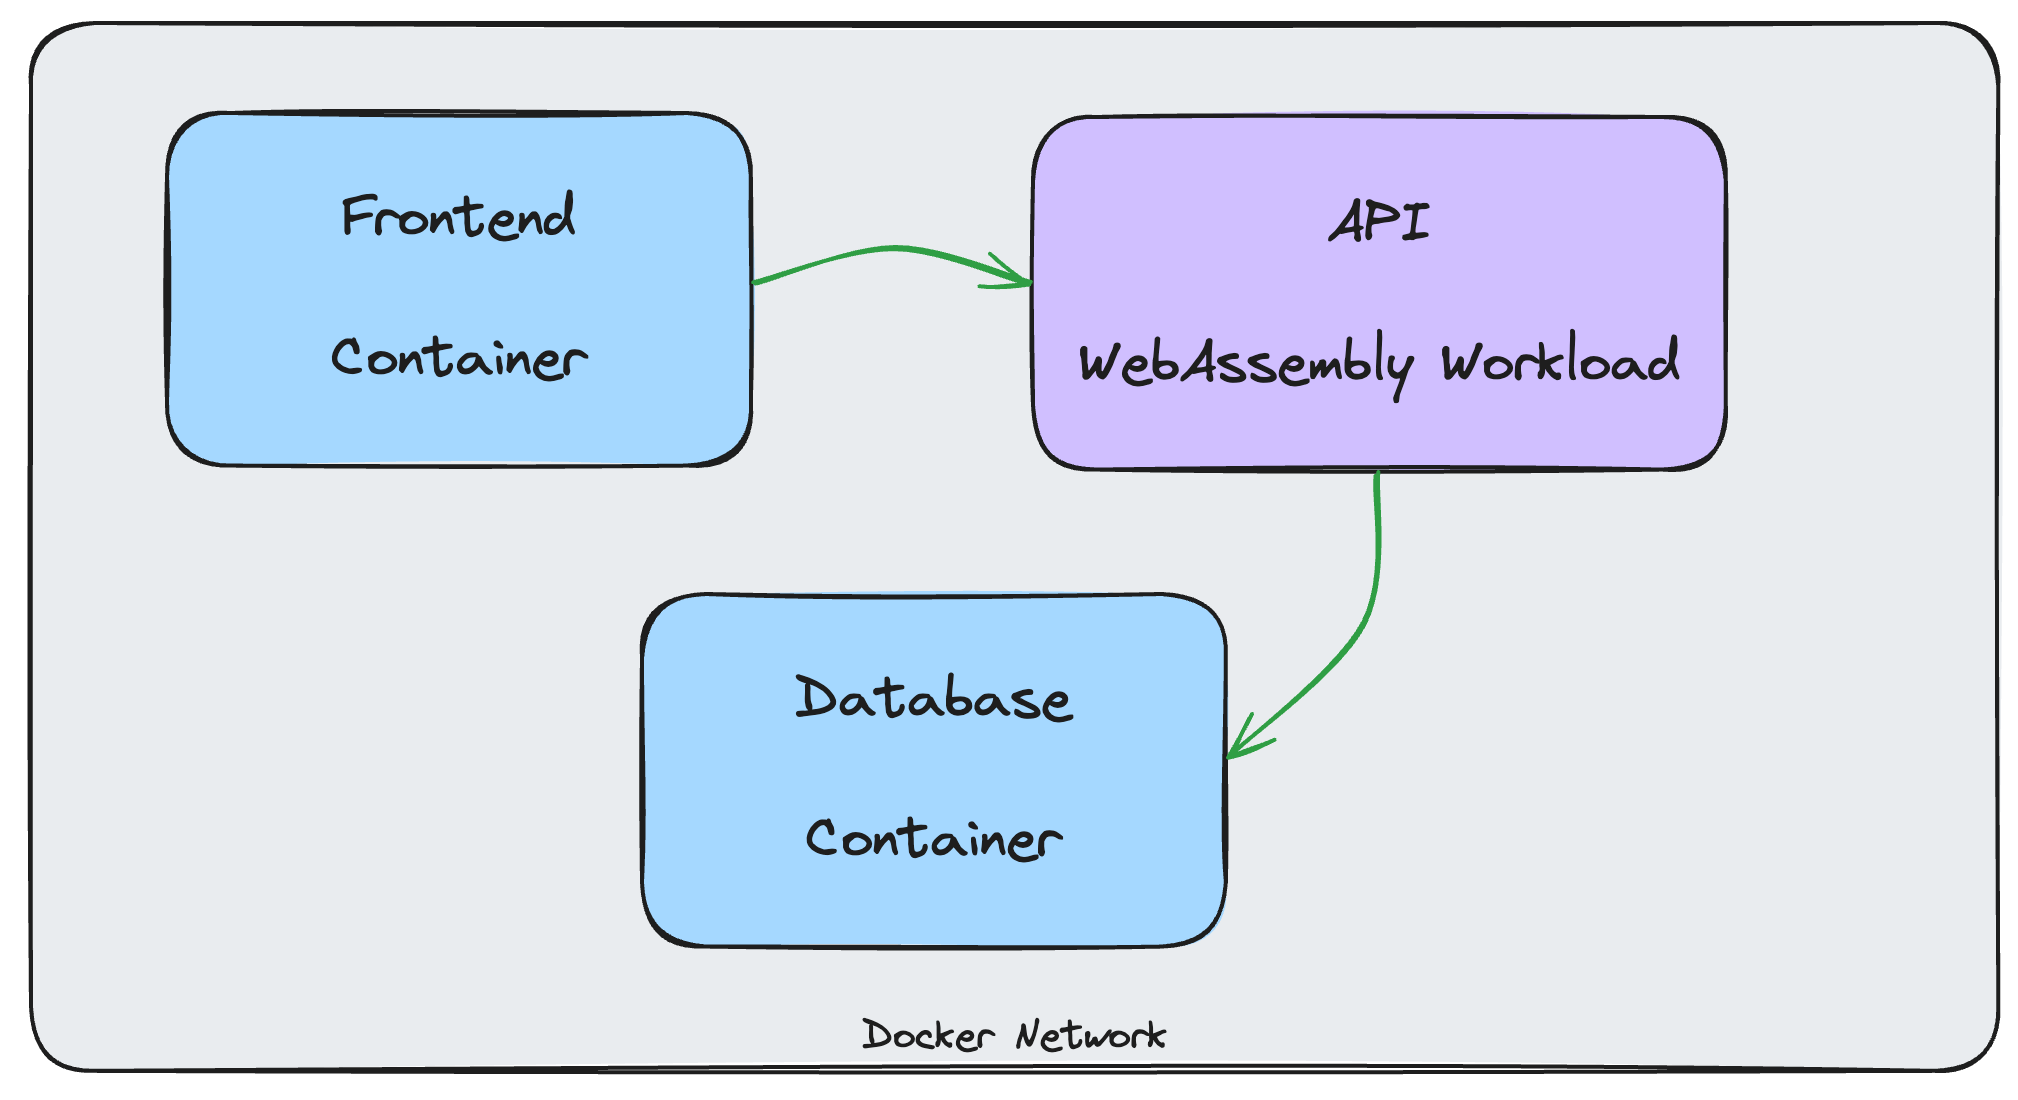
Wasm and Containers in Docker Desktop: High-Level Architecture
You can find the source code over on GitHub at https://github.com/ThorstenHans/docker-desktop-containers-and-wasm.
Prerequisites🔗
To follow along the steps outlined in this article, you must have the following software installed on your local machine:
- Docker Desktop (I’m currently on
4.28.0) - Spin CLI (I’m currently on
2.2.0) - Node.js (I’m currently on
20.11.1 (LTS))
Activate Wasm Workloads in Docker Desktop🔗
Support form Wasm workloads requires the containerd image store feature to be turned on. If you’re not already using containerd image store in Docker Desktop, hen pre-existing images and containers will be inaccessible.
Follow these steps to enable containerd image store :
- Open DOCKER DESKTOP and navigate to SETTINGS
- On the GENERAL tab, activate
Use containerd for pulling and storing images - On the FEATURES IN DEVELOPMENT tab, activate
Enable Wasm - Click
Apply & restartto save the settings - When prompted, click
Installto confirm the installation of different Wasm runtimes
Basically, it should look like this:
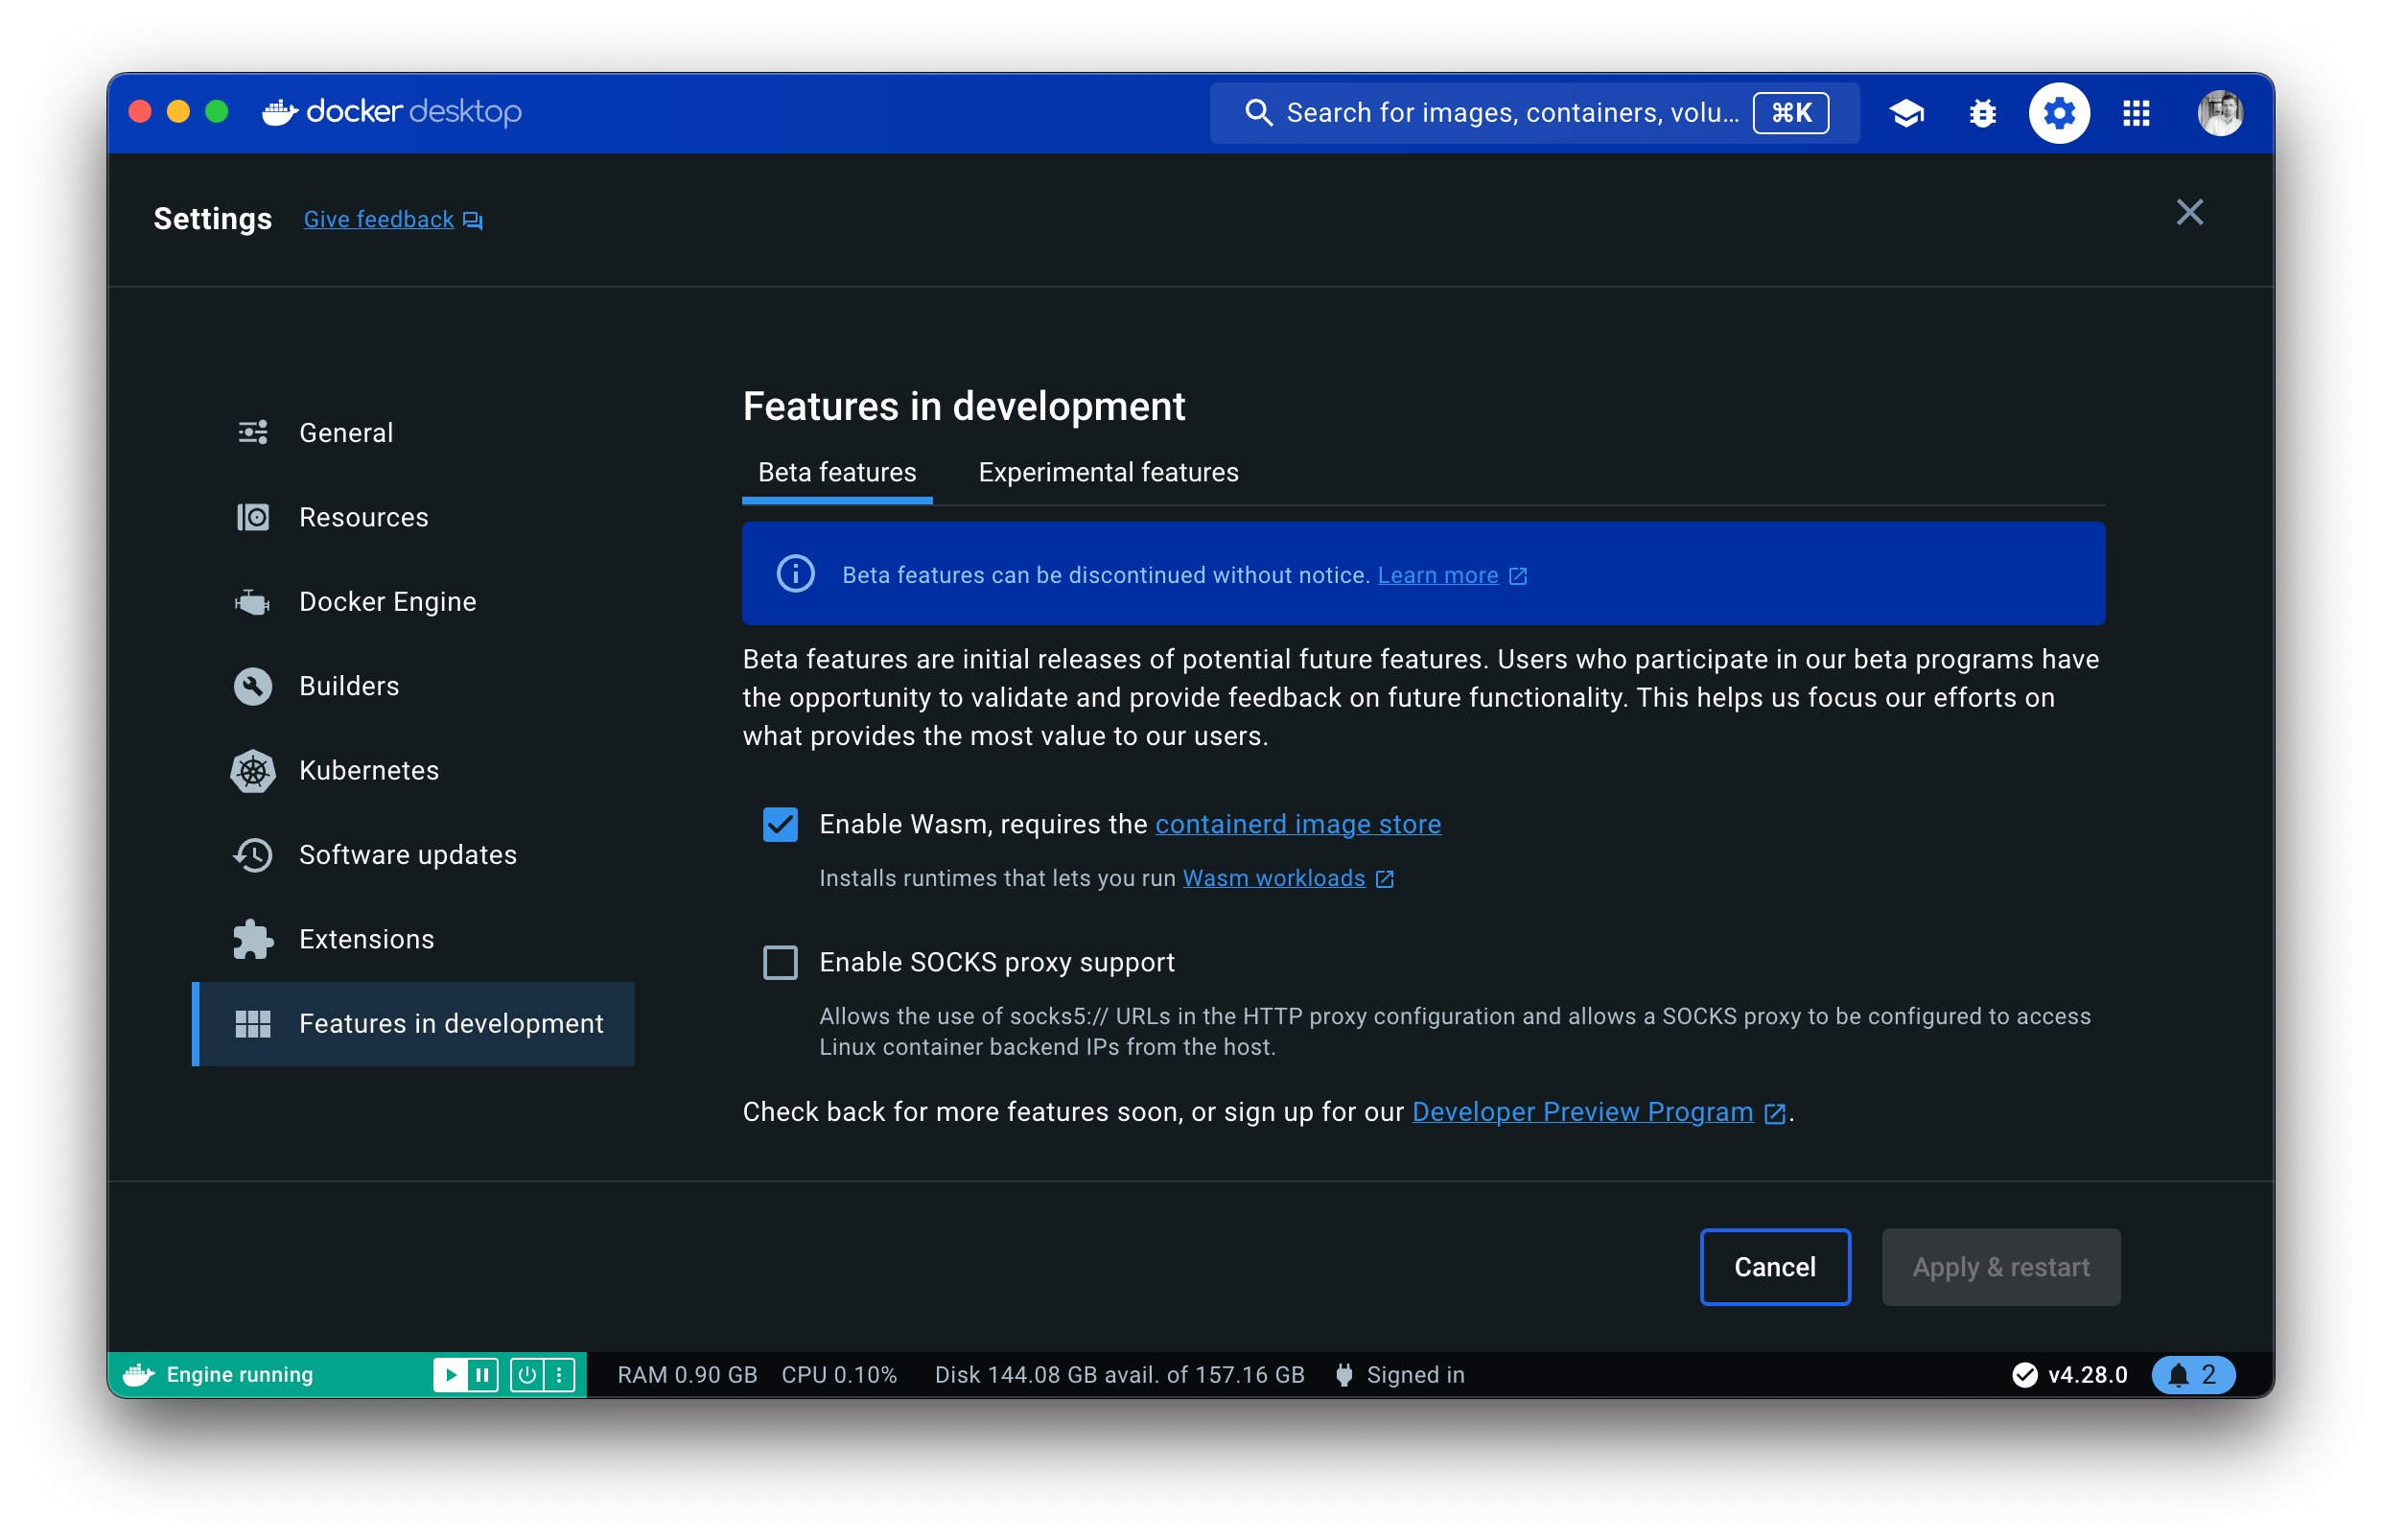
Wasm enabled in Docker Desktop
Which Wasm Runtimes will be Installed🔗
With completing the steps in the previous paragraph, you have successfully activated support for Wasm workloads in Docker Desktop. This means the following Wasm runtimes have been installed for you:
io.contianerd.spin.v2io.containerd.slight.v1io.containerd.wasmedge.v1io.containerd.wasmtime.v1io.containerd.lunatic.v1io.containerd.wws.v1io.containerd.wasmer.v1
Hello World - The Wasm in Docker Desktop edition🔗
Before we dive into the orchestrating the sample application, let’s check the obligatory boxes and build a simple Hello, World application using Spin. First, let’s bootstrap the hello-docker application as shown here:
# Move to your "dev|projects|source" folder
cd ~/dev

# Create a new Spin App using the http-js template and stick with the defaults
spin new -t http-js -a hello-docker

# Move into the hello-docker folder
cd hello-docker

# Ensure dependencies are installed
npm install
# -- snip --

# Build the Spin App
spin build
Building component hello-docker with `cargo build --target wasm32-wasi --release`
# --snip--

Finished building all Spin components
Containerizing a Spin App🔗
For distributing a Spin App, we facilitate a plain Docker image (FROM SCRATCH). This makes integration with existing tooling and platforms a no-brainer. Go ahead and create a Dockerfile in hello-docker with the following content:
FROM scratch
COPY spin.toml /spin.toml
COPY target/wasm32-wasi/release/hello_docker.wasm /target/wasm32-wasi/release/hello_docker.wasm
ENTRYPOINT ["/spin.toml"]
Instead of publishing the container image to Docker Hub, GitHub Container Registry (GHCR) or others, we’ll use ttl.sh to store our hello-docker image for 2 hours only:
# Create and push OCI artifact to ttl.sh
docker buildx build --platform wasi/wasm \
  --provenance=false \
  -t ttl.sh/hello-docker:2h \
  --push .
[+] Building 0.1s (6/6) FINISHED                          docker:desktop-linux
# --snip--
 => pushing ttl.sh/hello-docker:2h with docker.                           1.3s
 => => pushing layer 7f55fe8c6d82                                         1.1s
 => => pushing layer 4a3bd2a35e86                                         1.1s
Running Hello World - The Wasm in Docker Desktop edition🔗
We can run the hello-docker Spin App in Docker Desktop and forward traffic from port 8080 of your local machine to port 80 of the Spin App. To do so, we use the good old docker run command:
# Run Spin App (Wasm) in Docker Desktop
docker run --name hello-docker \
  --detach \
  --runtime=io.containerd.spin.v2 \
  --platform=wasi/wasm \
  --publish 8080:80 \
  ttl.sh/hello-docker:2h

01772c9cd8604257342b49f73eb3f9052ed3d4c1d21e55ab37baca9487d6f1b4
Testing the Hello World - The Wasm in Docker Desktop edition🔗
You verify that everything is working as expected by sending a simple HTTP GET request to the root route using curl:
# Send a GET request to the Spin App
curl -iX GET http://localhost:8080
HTTP/1.1 200 OK
content-type: text/plain
transfer-encoding: chunked
date: Tue, 27 Feb 2024 20:23:22 GMT

Hello, Fermyon
Cleaning Up🔗
To stop and remove the Hello World application, you simply use docker rm -f hello-docker.
Orchestrating the Sample Application🔗
Now that you have made your way through building and running the obligatory Hello World on Docker Desktop, we can switch gears and orchestrate a real application that consists of regular containers and a Wasm workload.
Cloning the Sample Application🔗
Instead of writing the entire application from scratch, we will focus on orchestrating necessary components and making them work together using techniques like Docker Compose. That said, go ahead and clone the existing GitHub repository to your machine:
# Move to your "dev|projects|source" folder
cd ~/dev

# Clone the GitHub repository
git clone [email protected]:ThorstenHans/docker-desktop-containers-and-wasm.git

# Move into the cloned repository
cd docker-desktop-containers-and-wasm
Make yourself comfortable with the project layout. The most interesting parts are:
src/frontend/- The HTML frontend of the sample application (Containerized workload)src/api/- The HTTP API of the sample application (Wasm workload)*.Dockerfile- Dockerfiles for different application components (frontend,api,postgres)
Orchestration with Docker Compose🔗
Docker Compose (Compose) is really handy when it comes to orchestrating distributed architectures in Docker (without using something like Kubernetes). That said, let’s start from scratch here and create a new compose.yaml file inside the docker-desktop-containers-and-wasm folder.
Creating a dedicated Docker Network
First, let’s take care of the network for our sample application. We create a dedicated network to isolate the application from other containers running on your machine and place them in a subnet with CIDR 10.5.0.0/24 (can be customized to address your individual needs or setups):
networks:
  containers-and-wasm-sample:
    driver: bridge
    name: containers-and-wasm-sample
    ipam:
      config:
        - subnet: 10.5.0.0/24
          gateway: 10.5.0.1
Orchestrating Services with Compose
In Compose, every component of our application is represented by a service element. It’s a good idea to start with PostgreSQL, because it has no dependencies on other components. We’ll instruct Compose to build a new container image for the pg service using the postgres.Dockerfile. On top of that, we link the network (containers-and-wasm-sample) to the service and specify the necessary environment variables:
services:
  pg:
    image: pg
    build:
      context: .
      dockerfile: postgres.Dockerfile
      target: pg
    environment:
      POSTGRES_DB: todo
      POSTGRES_USER: bob
      POSTGRES_PASSWORD: secret
    networks:
      - containers-and-wasm-sample
networks:
  containers-and-wasm-sample:
    driver: bridge
    name: containers-and-wasm-sample
    ipam:
      config:
        - subnet: 10.5.0.0/24
          gateway: 10.5.0.1
Next in line is the Wasm workload (the API). We add a new service (api) to the list of services and provide necessary information platform and runtime to inform underlying Docker about this being a Wasm Workload and not a regular container. Traffic from the local port 8081 will be forwarded to our Wasm workload (listening on 80), because we want to call the API from a JavaScript client. Additionally, we list pg as a dependency, because we want our API to start once the database has been started:
services:
api:
    build:
      context: .
      dockerfile: api.Dockerfile
    platform: wasi/wasm
    runtime: io.containerd.spin.v2
    environment:
      SPIN_VARIABLE_DB_CONNECTION_STRING: postgres://bob:secret@pg/todo
    depends_on:
      - pg
    ports:
      - 8081:80
    networks:
      - containers-and-wasm-sample
  pg:
    image: pg
    build:
      context: .
      dockerfile: postgres.Dockerfile
      target: pg
    environment:
      POSTGRES_DB: todo
      POSTGRES_USER: bob
      POSTGRES_PASSWORD: secret
    networks:
      - containers-and-wasm-sample
networks:
  containers-and-wasm-sample:
    driver: bridge
    name: containers-and-wasm-sample
    ipam:
      config:
        - subnet: 10.5.0.0/24
          gateway: 10.5.0.1
Last but not least, we have to specify the frontend service. Again, we associate our custom network (containers-and-wasm-sample), forward traffic from the local port 8080 to port 80 of the container, and specify its dependencies (api):
services:
  frontend:
    build:
      context: .
      dockerfile: frontend.Dockerfile
    ports:
      - 8080:80
    depends_on:
      - api
    networks:
      - containers-and-wasm-sample
  api:
    build:
      context: .
      dockerfile: api.Dockerfile
    platform: wasi/wasm
    runtime: io.containerd.spin.v2
    environment:
      SPIN_VARIABLE_DB_CONNECTION_STRING: postgres://bob:secret@pg/todo
    depends_on:
      - pg
    ports:
      - 8081:80
    networks:
      - containers-and-wasm-sample
  pg:
    image: pg
    build:
      context: .
      dockerfile: postgres.Dockerfile
      target: pg
    environment:
      POSTGRES_DB: todo
      POSTGRES_USER: bob
      POSTGRES_PASSWORD: secret
    networks:
      - containers-and-wasm-sample
networks:
  containers-and-wasm-sample:
    driver: bridge
    name: containers-and-wasm-sample
    ipam:
      config:
        - subnet: 10.5.0.0/24
          gateway: 10.5.0.1
That’s it. We orchestrated the entire sample (which consists of multiple containers and a Wasm workload) and isolated all components into a dedicated Docker Network.
Building and Running with Docker Compose🔗
You can use the Makefile (located in the root directory of the sample) to build and run the sample application locally using Docker Desktop. The Makefile is just a wrapper around docker compose with one critical extension. Before building the distribution image for the Wasm workload, we must ensure the latest source code (JavaScript for this sample) has been compiled into Wasm.
Basically, the flow looks like this:
# Build the Spin App
make build

# Run the entire sample application locally
make run
The make run target invokes docker compose up -d which starts all containers and Wasm workloads in the detached-mode. If you wanna see the status of individual components, you can either use make logs or inspect all components using plain Docker CLI (docker ps, …).
From docker ps you can immediately spot all components running locally, and desired port forwarding configured as expected:
# List Everything
docker ps
CONTAINER ID   IMAGE              COMMAND          CREATED          STATUS          PORTS                  NAMES
d15b4fe369da   wasm-dd-frontend   "/docker-ent…"   23 seconds ago   Up 22 seconds   0.0.0.0:8080->80/tcp   fe-1
38344cab953a   wasm-dd-api        "/spin.toml"     23 seconds ago   Up 22 seconds   0.0.0.0:8081->80/tcp   api-1
3056fd858036   pg                 "docker-entr…"   23 seconds ago   Up 22 seconds   5432/tcp               pg-1
Open http://localhost:8080/. You should now see the simple todo application being rendered as shown in the following figure:
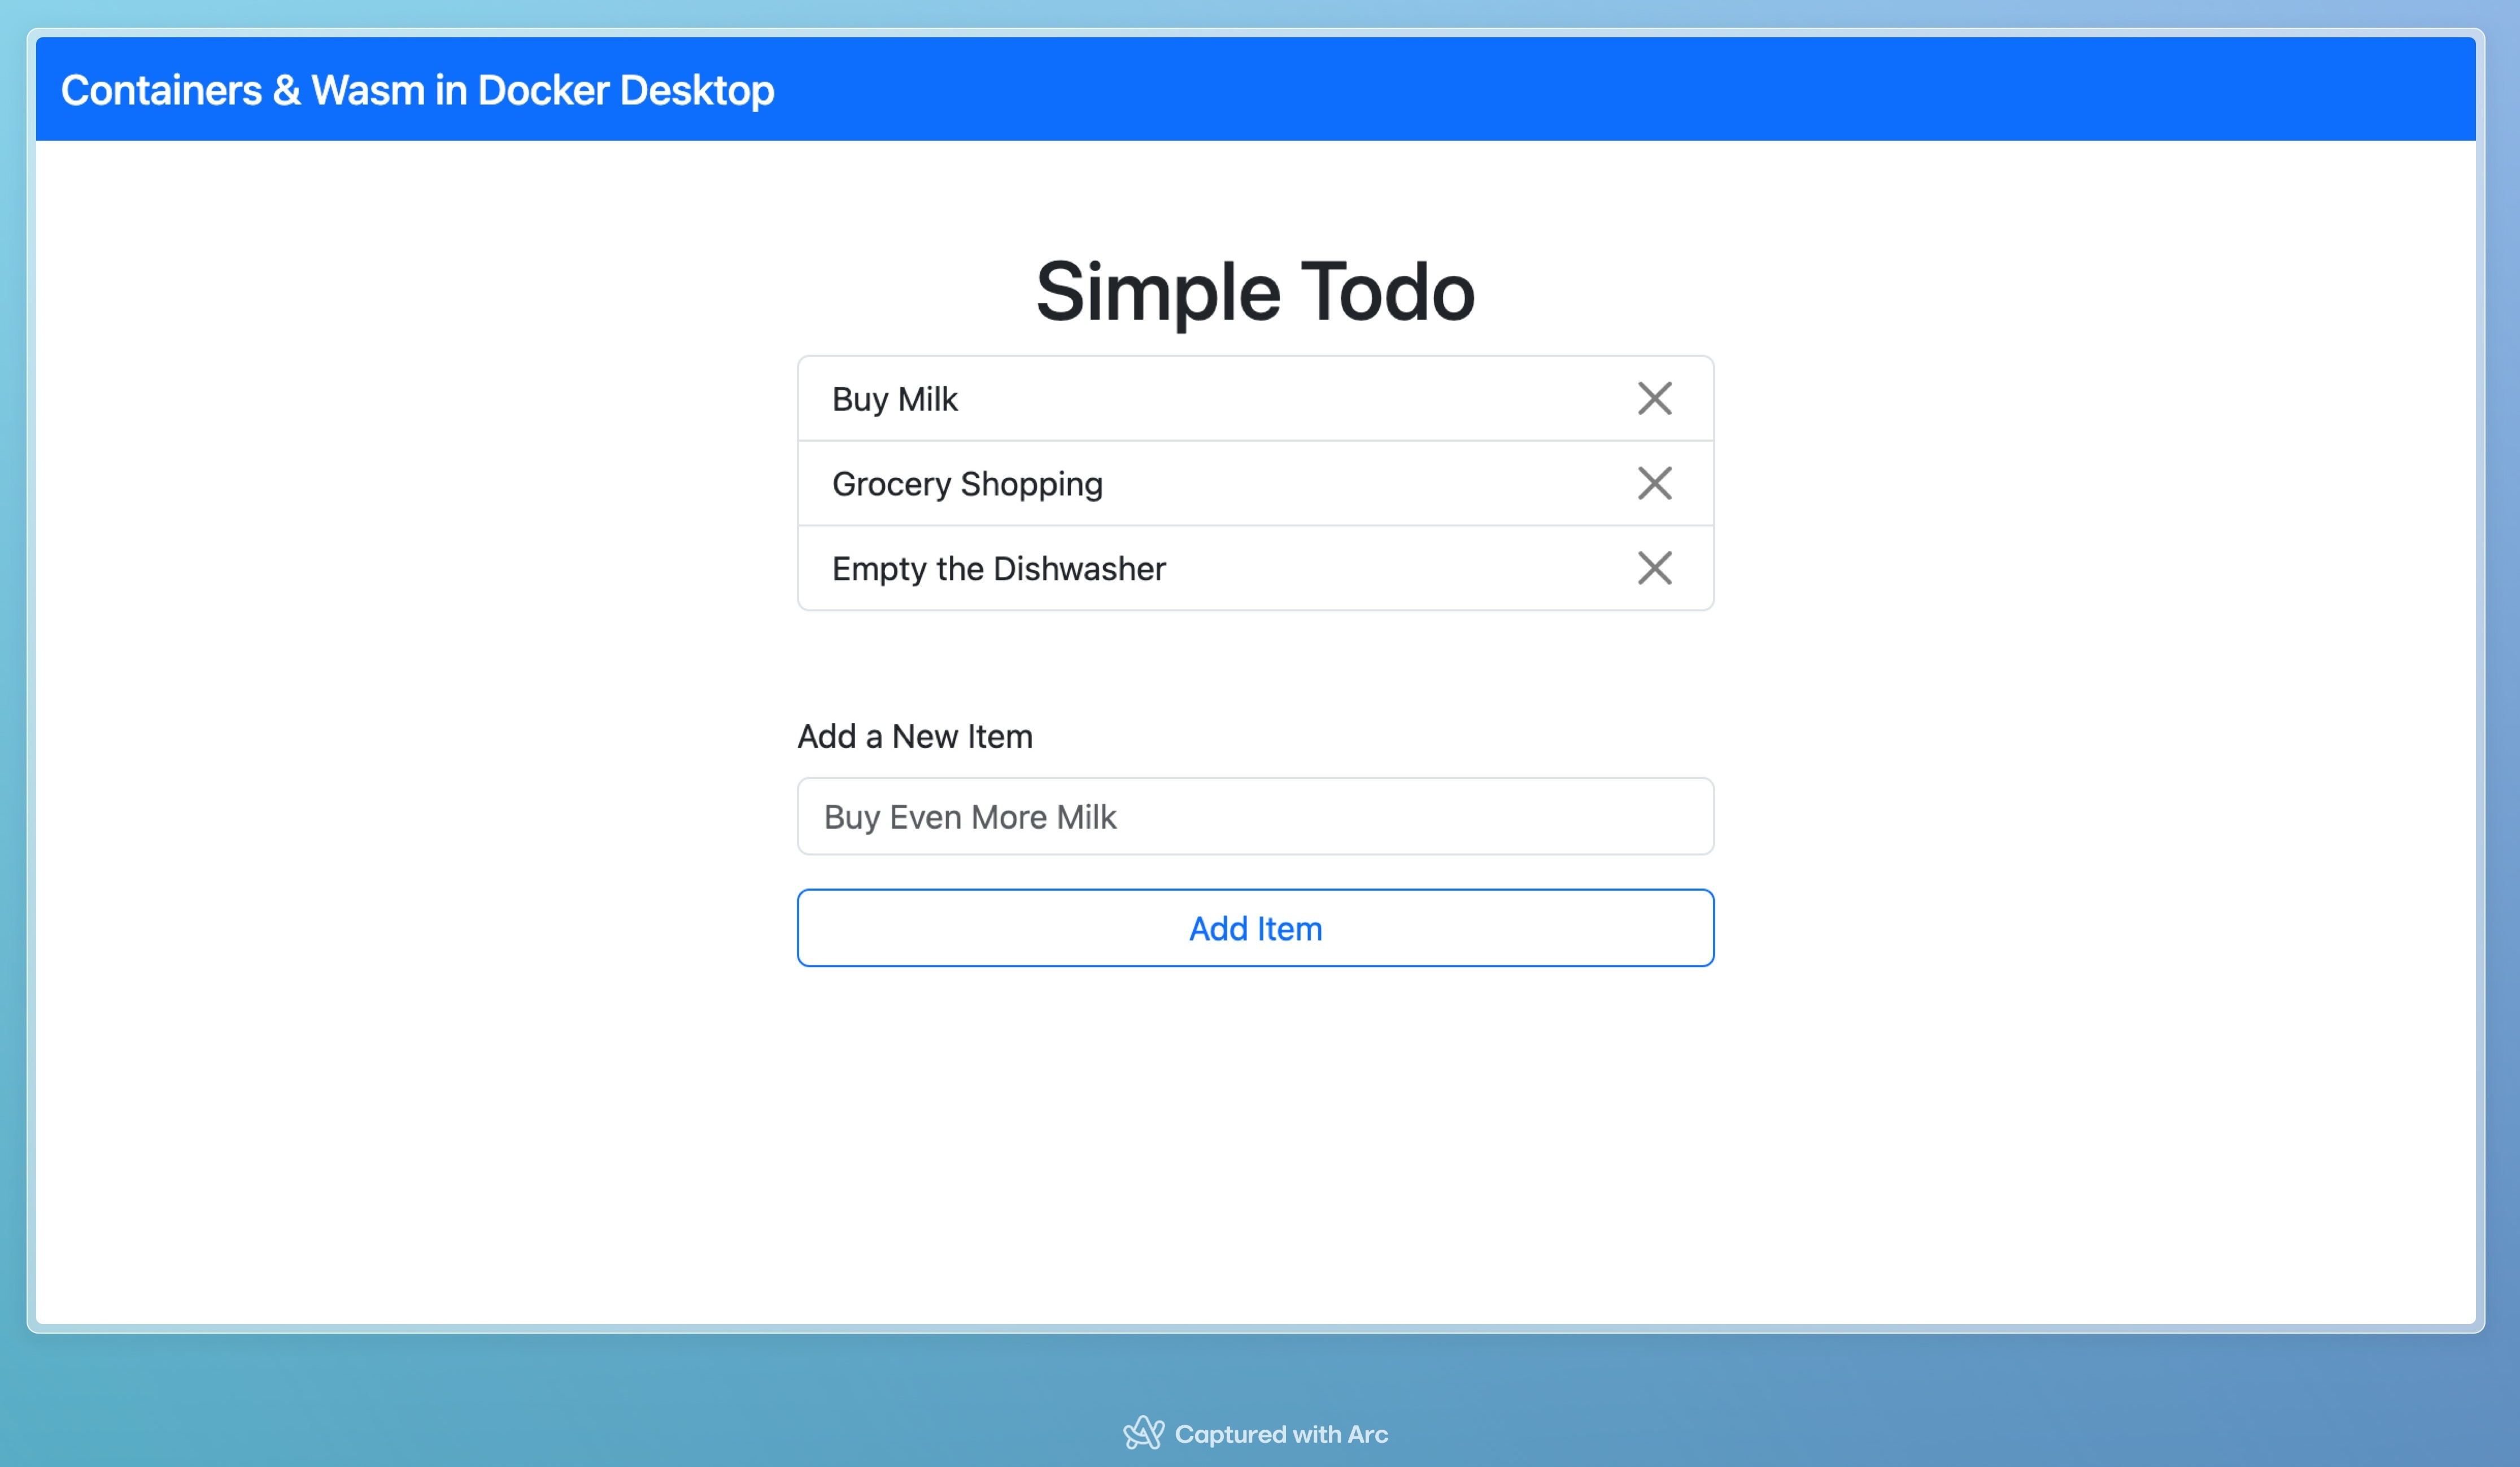
Sample App built with Wasm and Containers running in Docker Desktop
Destroying and Cleaning Up🔗
You can stop the sample application using make stop. As part of building the application several container images have been created. You can inspect them using docker image ls. You can either delete those images one-by-one using docker image rm, or you can use commands like docker image prune to remove all unused images from your local machine.
Conclusion🔗
Docker Desktop is a great place to explore the conjunction of Containers and WebAssembly. Although support for Wasm workloads is still a beta feature, I was able to build and run different distributed architectures with recent releases of Docker Desktop.
Wasm will have a vast impact on how we, as developers, build software in the years to come. Docker Desktop is a great platform to explore and deepen your knowledge of server-side WebAssembly.