Automate Azure with Azure Functions and Go
Automation is key to success in the cloud. In this article, we will look at how to automate recurring tasks using Azure SDK for Go with Azure Functions. This article contributes to the Go Advent Calendar🎄. If you haven’t heard about it, you should check out all the awesome content contributed to the Go Advent Calendar and level up your Go programming skill during the holiday season.
The sample code shown in this article can be found in this repository on GitHub.
That said, let’s jump right into the scenario.
Scenario🔗
We will build simple yet important housekeeping automation for Azure leveraging Azure SDK for Go for demonstration purposes. As the following architectural diagram shows, we will have a job running every workday at 3 am that iterates over all resource groups in our Azure subscription and deletes resource groups not required anymore.
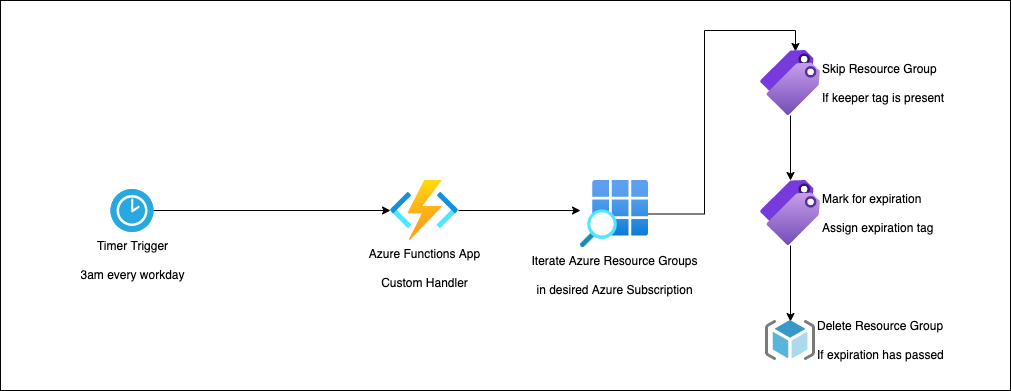
Automating Azure Cloud with Azure Functions and Go
The automation leverages Azure Tags - simple key-value pairs assigned to different Azure resources - to verify if a particular resource group should be deleted or not. To prevent our cloud automation from accidentally removing important cloud resources, we will set an expiration date (current date + 7 days) on every resource group that should be removed. The resource group will be deleted when that expiration date has passed. From a technical point of view, we will use Azure Functions with a timer trigger. In Azure Functions, we can use custom handlers to support Go.
What is Azure SDK for Go🔗
Azure SDK for Go has been around for quite some time now. However, the Azure SDK team is currently revamping the entire SDK and providing a streamlined, homogenous experience. Azure SDK for Go addresses different workloads, which can be divided into two main categories:
- Resource Consumption
- Resource Management
Resource Consumption🔗
Let’s take Azure Storage Accounts, for example. A super simple yet powerful service provided by Azure to deal with different kinds of data. As application developers, we want to consume data stored in the service or persist data that our application users have provided. Azure SDK for Go provides the necessary functionality to do so.
Resource Management🔗
On the other side, Azure SDK for Go allows us to provision, mutate, and delete cloud resources in Azure. Are you working with containers? If so, you can spin up a new Azure Container Registry (ACR) in no time by using the corresponding APIs provided by the SDK.
Implementing the cloud automation🔗
The automation process described during the introduction of this article is - by intention - reasonably simple. However, it allows us to get started with Azure SDK for Go and learn how to interact with Azure from within Go. We have to add necessary dependencies to our Go application to get started:
mkdir -p go-advent/cmd
cd go-advent

go mod init github.com/ThorstenHans/go-advent

# Install module for AuthN
go get github.com/Azure/azure-sdk-for-go/sdk/azidentity

# Install to from core module to simplify casting
go get github.com/Azure/azure-sdk-for-go/sdk/azcore/to

# Install module to work with Azure Resource Groups
go get github.com/Azure/azure-sdk-for-go/sdk/resourcemanager/resources/armresources
Having the project all necessary dependencies installed, we can build the API interface, which allows Azure Functions to call into our custom code.
Building the API interface🔗
package main

import (
    "fmt"
    "net/http"
)

func handleTick(w http.ResponseWriter, r *http.Request) {
    if r.Method != http.MethodPost {
        http.NotFound(w, r)
        return
    }
    if err := CleanUpResourceGroups(); err != nil {
        http.Error(w, "Internal Server Error", http.StatusInternalServerError)
        return
    }
    w.WriteHeader(http.StatusOK)
}

func main() {
    p, ok := os.LookupEnv("FUNCTIONS_CUSTOMHANDLER_PORT")
    if !ok {
        p = "8080"
    }
    addr := fmt.Sprintf(":%s", p)
    http.HandleFunc("/CleanUpResourceGroups", handleTick)
    http.ListenAndServe(addr, nil)
}
When using Azure Functions with custom handlers, Azure Functions runtime will invoke our Go application by issuing HTTP requests. In the simples form, the invocation is done by issuing an HTTP Post request to an endpoint named like our function. Additionally, the Azure Functions host provides the port we must use to expose our HTTP interface as the FUNCTIONS_CUSTOMHANDLER_PORT environment variable.
If you want to dive deeper into custom handlers for Azure Functions, you should check out my post on Azure Functions with Go and read this page of the Azure Functions documentation.
Authentication with Azure Identity (azIdentity)🔗
To interact with Azure, we must authenticate. There are plenty of different patterns available to authenticate with Azure. However, the Azure SDK provides a convenient function NewDefaultAzureCredential, making authentication painless. Azure Functions supports Managed Service Identities (MSI), which allows us to configure Role-Based Access Control (RBAC) directly in Azure. This allows our automation to interact with the desired Azure resources.
// authenticate with Azure
cred, err := azidentity.NewDefaultAzureCredential(nil)

if err != nil {
    log.Printf("Error while loading Azure credentials %s", err)
    return err
}
Mutating Azure Cloud🔗
As mentioned during the introduction, our sample automation will check every Resource Group of an Azure Subscription and check if it is tagged with a specific tag (com.thorsten-hans.keeper). If a Resource Group does not have this tag assigned, it will be marked for deletion by adding the com.thorsten-hans.expiration tag with a future timestamp.
If a Resource Group has the com.thorsten-hans.expiration tag assigned and its timestamp has passed, the Resource Group will be deleted. Otherwise, the Resource Group will not be modified.
We can iterate all Resource Group using the List function on an instance of ResourceGroupsClient. See the following snippet demonstrates how to iterate all Resource Groups:
func CleanUpResourceGroups() error {

    // omitted loading credentials and subscriptionId
    updates := make([]string, 0)
    removals := make([]string, 0)
    client := armresources.NewResourceGroupsClient(subscriptionId, cred, nil)

    pager := client.List(nil)
    for pager.NextPage(context.Background()) {
        if err := pager.Err(); err != nil {
            log.Printf("Failed to load next page %s", err)
            return err
        }

        k, hasKeeper := rg.Tags["com.thorsten-hans.keeper"]
        e, hasExpiration := rg.Tags["com.thorsten-hans.expiration"]

        if hasKeeper {
            log.Printf("'%s' has keeper tag. Will leave it as it is.", *rg.Name)
            continue
        } else if !hasExpiration {
            log.Printf("'%s' will be marked for expiration.", *rg.Name)
            updates = append(updates, *rg.Name)
            continue
        } else if isExpired(e) {
            log.Printf("'%s' is expired... Will delete it.", *rg.Name)
            removals = append(removals, *rg.Name)
            continue
        } else {
            log.Printf("'%s' already marked for expiration. Will check again at next run...", *rg.Name)
        }
    }
    applyUpdates(updates)
    applyRemovals(removals)
}

func isExpired(value string) bool {
    // check if value is older than current date
    return true
}
Fortunately, tags are part of armresources.ResourceGroup, which we will get for every Resource Group due to calling the List function. We can add new tags to a Resource Group and use Update to persist our modification.
func applyUpdates(updates []string, client *armresources.ResourceGroupsClient) error {
    for _, u := range updates {

        r, err := client.Update(context.Background(), u, armresources.ResourceGroupPatchable{
            Tags: map[string]*string{
                "com.thorsten-hans.expiration": to.StringPtr(getExpiration()),
            }},nil)

        if err != nil {
            log.Printf("Error while updating Resource Group '%s': %s", u, err)
            return err
        }

        log.Printf("Resource Group '%s' updated successfully", *r.Name)
    }
    return nil

}
Finally, we can delete a Resource Group (if the previously mentioned condition evaluates to true) using the BeginDelete function as shown here:
func applyRemovals(removals []string, client *armresources.ResourceGroupsClient) error {

    for _, r := range removals {
        p, err := client.BeginDelete(context.Background(), r, nil)
        if err != nil {
            log.Printf("Error while trying to begin removal of Resource Group '%s'", r)
            return err
        }
        _, err = p.PollUntilDone(context.Background(), 15*time.Second)
        if err != nil {
            log.Printf("Error while removing Resource Group '%s'", r)
            return err
        }
    }
    return nil

}
Configure Azure Function with a timer trigger🔗
Azure Functions are typically grouped in projects. We can create new Azure Functions projects using Azure Functions Core Tools (func CLI) or the official Azure Functions extension for Visual Studio Code. For demonstration purposes, let’s spin up a new Azure Functions project with func:
mkdir functions
cd functions

# Create a new Azure Functions project
func init --worker-runtime custom
We want Azure Functions to call our custom handler every workday at 3 am. We instruct Azure Functions by adding a function specification with a timer trigger set to the corresponding cron expression (0 3 * * 1-5 *).
By the way, do you know crontab.guru? It makes finding the proper cron expression super easy.
Having the correct cron expression in place, we can create the function. Again we can use func CLI:
# create the new function

func new -n CleanUpResourceGroups
Finally, let’s create a simple Makefile to build our code and place the binary in the functions folder (./functions)
# Makefile
build:
    env GOOS=linux GOARCH=amd64 go build -ldflags "-s -w" -o ./functions/handler ./cmd/main.go
Invoke the build now; you should see the handler executable placed in ./functions.
Deployment🔗
Before deploying our cloud automation to Azure Functions, we’ve to provide several necessary services in Azure. Find the deploy folder in the sample repository. It contains a simple Terraform project that we will use to provision all necessary cloud infrastructure.
Provision necessary infrastructure🔗
To provision the cloud infrastructure, Terraform ClI (terraform) must be installed on your machine. Although Terraform interacts directly with Azure Resource Manager API, we must authenticate Terraform. Again there are different ways to authenticate. To keep things simple, I recommend installing Azure CLI (az) and authentication using az login. Terraform can use existing authentication tokens from az.
Although this is great for development scenarios and inner loop experience, you should never rely on Azure CLI authentication when provisioning production workloads with Terraform. Instead, you should use a dedicated Service Principal or a Managed Service Identity (MSI).
# login with Azure CLI
az login

# Select desired Azure Subscription
# List all available Subscriptions
az account list -o table

# Set Subscription
az account set --subscription <SUBSCRIPTION_ID>
Being authenticated and having selected the desired Azure Subscription, you can deploy the infrastructure with Terraform:
cd deploy
# initialize the Terraform project
terraform init

# provision the infrastructure
# terraform apply will show which resources will be provisioned
# you have to approve this operation
# otherwise, nothing will be provisioned
terraform apply
Deploy you Go app to Azure Functions🔗
Deploying our application to Azure Functions is also straightforward with func. Everything we need is the name of the desired Azure Functions instance:
# Deploy to Azure Functions instance

cd functions

func azure functionapp publish fnapp-cloud-automate-go
Test the cloud automation🔗
After the first run of the automation, we can easily verify if cleanup has finished successfully by browsing the resource groups using Azure portal. Resource Groups that were not tagged with the keeper tag (com.thorsten-hans.keeper) will now have the expiration tag (com.thorsten-hans.expiration), and a corresponding value assigned as the following picture shows:
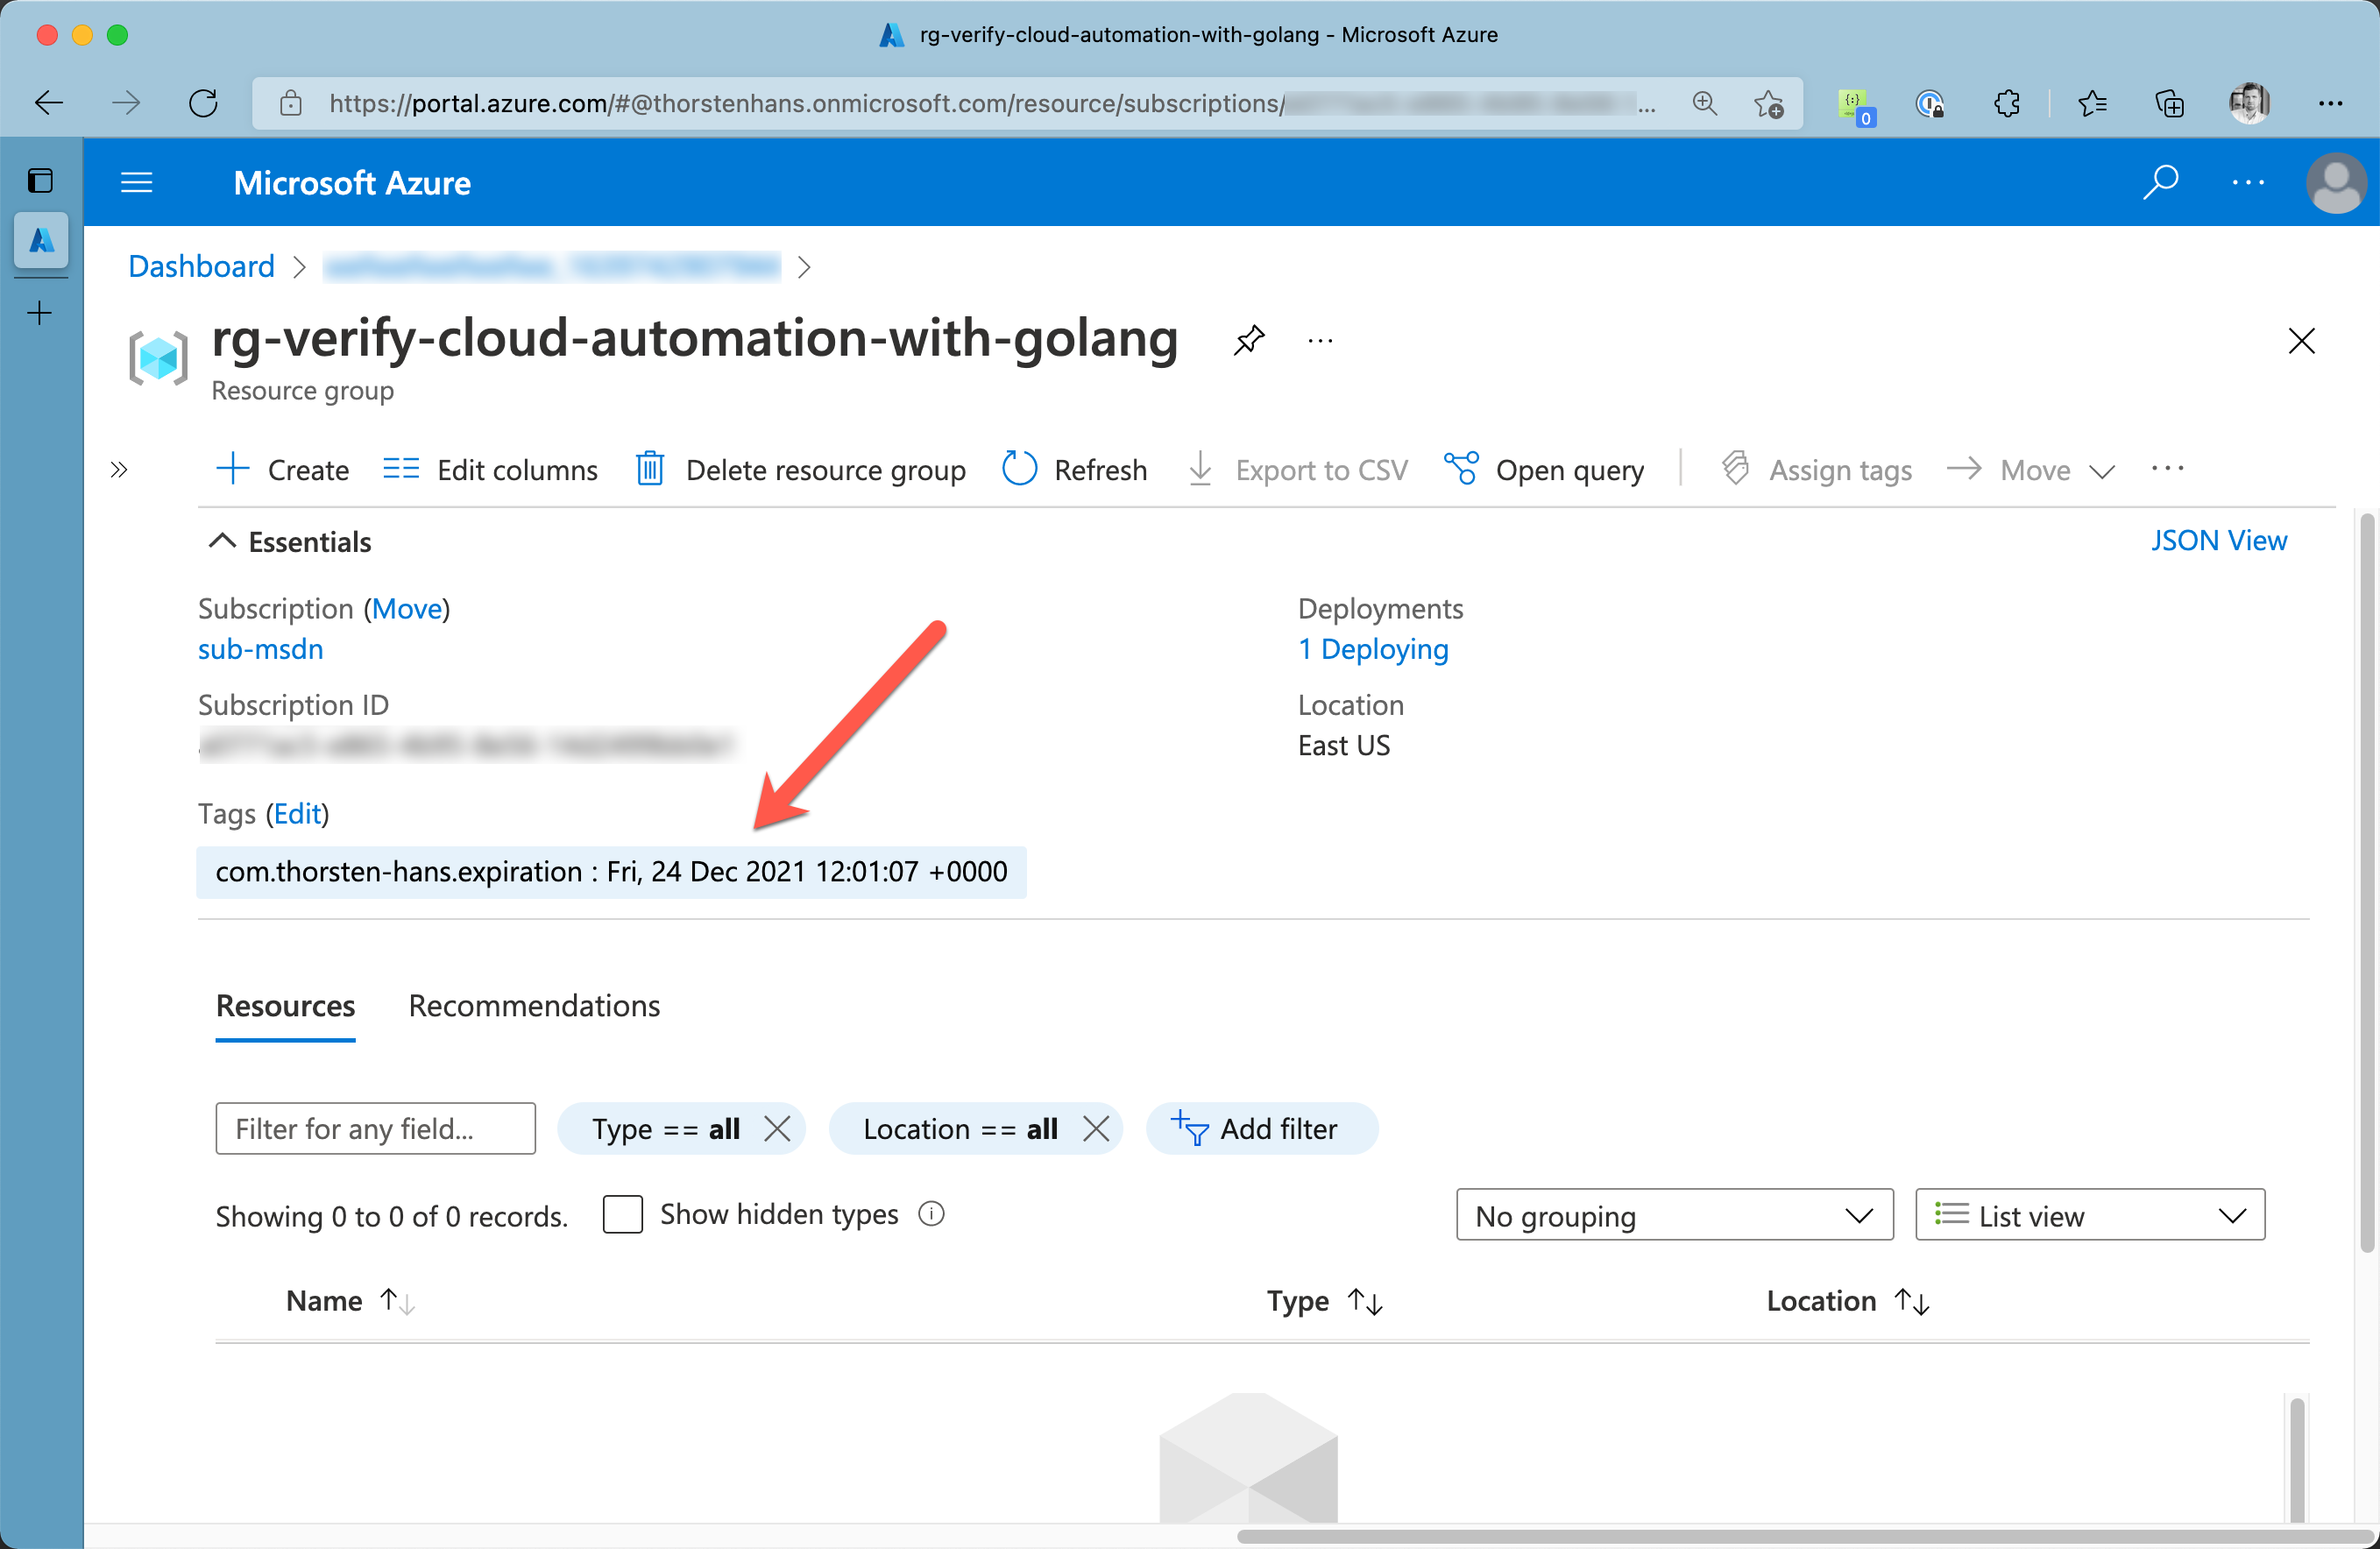
Verify cloud automation results in Azure Portal
Cleanup🔗
If you want to remove all previously provisioned cloud infrastructure, you can use terraform destroy as shown here:
cd deploy
# delete all cloud infrastructure again
terraform destroy -auto-approve
Conclusion🔗
As shown in this article, Azure SDK for Go can easily automate administrative tasks. Automation applications and resource management has become even easier with the new SDK supporting Go modules and providing a simplified, homogeneous development experience.
Remember that Azure SDK for Go provides more than just simple CRUD operations for managing Azure resources. You can use Azure SDK for Go to actually “consume” services like Azure Storage Account and others to build your app on top of them.
Find all sample code in this repository on GitHub.