Background Workers in Azure Container Apps with KEDA
Azure Container Apps has quickly evolved and become one of the most popular platforms to run containerized workloads in Azure. This article will look at how to run Background Workers in Azure Container Apps leveraging built-in KEDA.
Developers can use Azure Container Apps to run simple cloud-native applications leveraging popular underlying technologies like Kubernetes, Dapr, and KEDA. Before we dive into building and running a background worker in Azure Container Apps, let’s do a quick refresher on what KEDA is and what it can do for us.
- What is KEDA
- The Example Application
- Implementing the Background Worker
- Infrastructure Specification using Project Bicep
- Test the sample application
- What we’ve covered today
- Conclusion
What is KEDA🔗
KEDA (Kubernetes Event Driven Autoscaler) is a cloud-native application deployed into Kubernetes. With KEDA, we can scale individual containers of a distributed (or cloud-native) architecture based on “contextual load”. By saying “contextual load”, I mean that you can configure horizontal scaling based on signals inside or outside your applications to manage and deal with increased load automatically. In KEDA, we use so-called “scalers” that connect Kubernetes’ Horizontal Pod Autoscaler with external signal sources like:
- Cloud platforms
- Databases
- Messaging systems
- Telemetry systems
- CI/CD platforms
Currently, KEDA supports more than 50 different scalers. You can find the entire list of built-in scalers on the official KEDA website. If you want to dive deeper into KEDA at this point, you should check out its official documentation at https://keda.sh.
The Example Application🔗
The example is relatively simple yet complex enough to demonstrate the need to design cloud-native architectures that scale and illustrate how we can do that with Azure Container Apps and KEDA.
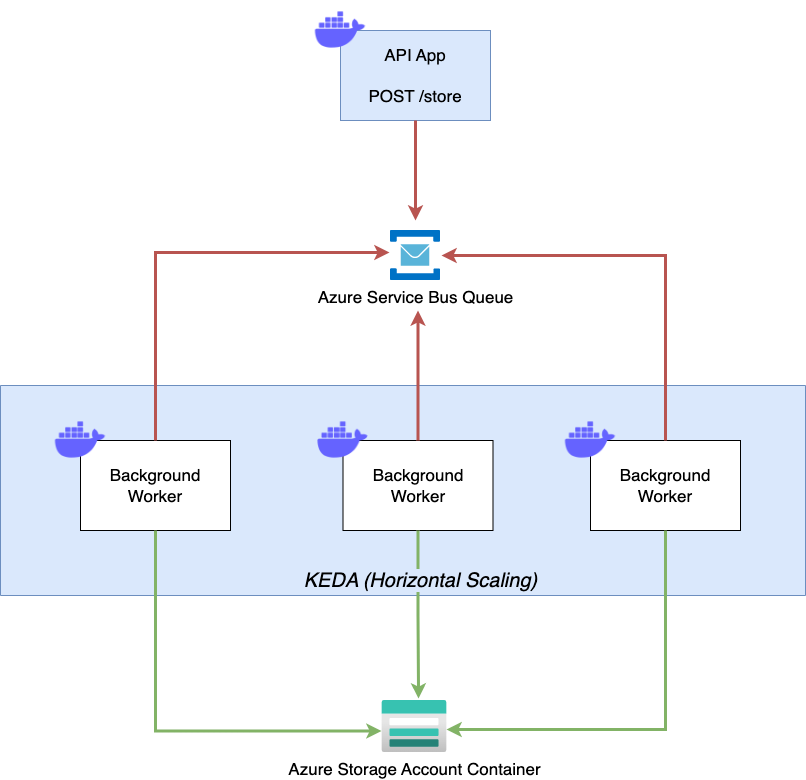
The sample application consists of two containers. First, we have a simple HTTP API that exposes a single POST endpoint at /store, to which we can send a simple JSON payload. The API takes the incoming payload and forwards it as a message to a Queue. For demonstration purposes, we’ll use an Azure Service Bus Queue here.
The second container is our actual background worker. It continuously processes the messages from the Service Bus queue and stores the content of every message as a blob in an Azure Storage Account. We’ll deploy both containers to Azure Container Apps and configure the background worker to scale out dynamically based on the number of messages appearing in the Azure Service Bus Queue.
Azure Container Apps Background Workers - Sample
Although the following paragraphs focus on the background worker and the Azure Container App deployment (we’ll use Project Bicep here), you can find the source code of the entire sample application in the 013-background-worker folder of my Azure Container Apps sample repository.
Implementing the Background Worker🔗
The background worker is implemented using .NET. However, you can implement similar workers using other programming languages as long as you can consume messages from the desired message queue. To set up the background worker, we’ll create a new console application and add necessary NuGet packages so we can communicate with both Azure Storage Blobs and Azure Service Bus APIs:
# create the background worker project
dotnet new worker -n BackgroundWorker -o ./worker
cd worker

# Add necessary NuGet-package
dotnet add package Azure.Storage.Blobs
dotnet add package Azure.Messaging.ServiceBus
First, let’s take care about bootstrapping the background worker with proper configuration, logging, and Dependency Injection (DI) in place (Program.cs):
using Microsoft.Extensions.Configuration;
using Microsoft.Extensions.DependencyInjection;
using Microsoft.Extensions.Hosting;
using Microsoft.Extensions.Logging;
using Microsoft.Extensions.Logging.Console;
using BackgroundWorker;
using BackgroundWorker.Configuration;

var host = Host.CreateDefaultBuilder(args)
    .ConfigureLogging((ctx, logging) =>
    {
        logging.ClearProviders();
        logging.AddConsole(options => { options.FormatterName = ConsoleFormatterNames.Simple; });
    })
    .ConfigureServices((ctx, services) =>
    {
        services.Configure<BlobConfig>(options =>
            ctx.Configuration.GetRequiredSection(BlobConfig.SectionName).Bind(options));
        services.Configure<QueueConfig>(options =>
            ctx.Configuration.GetRequiredSection(QueueConfig.SectionName).Bind(options));
        services.AddHostedService<Worker>();
    }).Build();
await host.RunAsync();
The Worker class is the interesting part. First, we load the configuration from .NET DI. In ExecuteAsync, we create a new ServiceBusProcessor and set OnProcessMessageAsync as handler for every incoming message.
The handler itself creates a new BlobContainerClient client and uploads the body of the message to Azure Blob Storage. If uploading the blob to Azure Storage has finished, we finally remove the message from Azure Service Bus Queue.
using Azure.Messaging.ServiceBus;
using Azure.Storage.Blobs;
using Microsoft.Extensions.Hosting;
using Microsoft.Extensions.Logging;
using Microsoft.Extensions.Options;
using BackgroundWorker.Configuration;

namespace BackgroundWorker;

public class Worker : BackgroundService
{
    private readonly BlobConfig _blobConfig;
    private readonly QueueConfig _queueConfig;
    private readonly ILogger<Worker> _logger;

    public Worker(IOptions<QueueConfig> queueConfig, IOptions<BlobConfig> blobConfig, ILogger<Worker> logger)
    {
        _queueConfig = queueConfig.Value;
        _blobConfig = blobConfig.Value;
        _logger = logger;
    }

    protected override async Task ExecuteAsync(CancellationToken stoppingToken)
    {
        var processor = GetServiceBusProcessor();

        processor.ProcessMessageAsync += OnProcessMessageAsync;
        processor.ProcessErrorAsync += OnProcessErrorAsync;
        _logger.LogInformation("Start Queue processing for Azure Service Bus queue {QueueName}",
            _queueConfig.QueueName);
        await processor.StartProcessingAsync(stoppingToken);
        while (!stoppingToken.IsCancellationRequested)
        {
            await Task.Delay(TimeSpan.FromSeconds(1));
        }

        _logger.LogInformation("Stopping Queue processing for Queue {QueueName}", _queueConfig.QueueName);
        await processor.CloseAsync(stoppingToken);
    }

    private Task OnProcessErrorAsync(ProcessErrorEventArgs arg)
    {
        _logger.LogError("Error while processing message {EventSource}: {Error}", arg.ErrorSource,
            arg.Exception!.ToString());
        _logger.LogError("Will not upload to to {TargetContainerName}", _blobConfig.ContainerName);
        return Task.CompletedTask;
    }

    private async Task OnProcessMessageAsync(ProcessMessageEventArgs arg)
    {
        var fileName = $"{arg.Message!.MessageId}.json";
        var blobContainerClient = new BlobContainerClient(_blobConfig.ConnectionString, _blobConfig.ContainerName);
        _logger.LogInformation("Uploading message to blob: {BlobFileName} to container: {ContainerName}", fileName,
            _blobConfig.ContainerName);
        await blobContainerClient.UploadBlobAsync(fileName, arg.Message.Body!.ToStream())!;
        await arg.CompleteMessageAsync(arg.Message)!;
    }

    private ServiceBusProcessor GetServiceBusProcessor()
    {
        var client = new ServiceBusClient(_queueConfig.ConnectionString);
        return client.CreateProcessor(_queueConfig.QueueName);
    }
}
Containerizing the Background Worker🔗
Finally, we’ve to containerize both components. Let’s focus again on the BackgroundWorker. The “default” Dockerfile for .NET applications (Docker Extensions of Visual Studio and Visual Studio Code can generate those) is more than enough for this example:
FROM mcr.microsoft.com/dotnet/runtime:6.0-focal AS base
WORKDIR /app

# Creates a non-root user with an explicit UID and adds permission to access the /app folder
# For more info, please refer to https://aka.ms/vscode-docker-dotnet-configure-containers
RUN adduser -u 5678 --disabled-password --gecos "" appuser && chown -R appuser /app
USER appuser

FROM mcr.microsoft.com/dotnet/sdk:6.0-focal AS build
WORKDIR /src
COPY ["BackgroundWorker.csproj", "./"]
RUN dotnet restore "BackgroundWorker.csproj"
COPY . .
WORKDIR "/src/."
RUN dotnet build "BackgroundWorker.csproj" -c Release -o /app/build

FROM build AS publish
RUN dotnet publish "BackgroundWorker.csproj" -c Release -o /app/publish /p:UseAppHost=false

FROM base AS final
WORKDIR /app
COPY --from=publish /app/publish .
ENTRYPOINT ["dotnet", "BackgroundWorker.dll"]
With the Dockerfile in place, we can use docker CLI to build and push the Docker Image for the background worker.
# Build Docker Image for the Background Worker
docker build . -t thorstenhans/aca-background-worker:0.0.1

# Push the Docker Image to Docker Hub
docker push thorstenhans/aca-background-worker:0.0.1
Don’t forget to build the Docker Image for the API too. Check the sample folder. It also contains a simple shell script to build and push both containers (build-and-push-docker-images.sh). You can customize the script to push both images to Docker Hub using your username by changing the dockerUserName variable at the beginning of the script.
Infrastructure Specification using Project Bicep🔗
The necessary cloud infrastructure is deployed using Bicep (If you haven’t deployed Azure Container Apps with Bicep yet, consider reading my article first to dive into provisioning Azure Container Apps with Bicep).
The most interesting part is the actual configuration of the Background Worker. The snippet below shows how the individual Azure Container Apps module (aca.bicep) is configured to scale automatically leveraging KEDA once the threshold of messages in Azure Service Bus is exceeded:
module app_worker 'aca.bicep' = {
    name: 'app-worker'
    params: {
        location: location
        name: 'worker'
        containerAppEnvironmentId: containerAppEnvironment.outputs.id
        containerImage: '${dockerUserName}/${workerRepository}:${workerTag}'
        secrets: [
            {
                name: 'storage-account-connection-string'
                value: storageAccount.outputs.StorageAccountConnectionString
            }
            {
                name: 'service-bus-connection-string'
                value: serviceBus.outputs.ServiceBusConnectionString
            }
        ]
        envVars: [
            {
                name: 'QueueConfig__QueueName'
                value: queueName
            }
            {
                name: 'QueueConfig__ConnectionString'
                secretRef: 'service-bus-connection-string'
            }
            {
                name: 'BlobConfig__ContainerName'
                value: resultsContainerName
            }
            {
                name: 'BlobConfig__ConnectionString'
                secretRef: 'storage-account-connection-string'
            }
        ]
        useExternalIngress: false

        minReplicas: 0
        maxReplicas: 10
        scaleRules: [
            {
                name: 'queue-trigger'
                custom: {
                    type: 'azure-servicebus'
                    metadata: {
                        queueName: queueName
                        messageCount: '5'
                    }
                    auth: [{
                        secretRef: 'service-bus-connection-string'
                        triggerParameter: 'connection'
                    }]
                }
            }
        ]
    }
}
We specify scaling boundaries by providing 0 for minReplicas and 10 for maxReplicas, meaning that KEDA can dynamically scale our background worker from zero to ten replicas. To link scaling behavior to the number of messages in the Azure Service Bus queue, we define a custom scaleRule. For demonstration purposes, we set messageCount to 5, meaning that KEDA will start scaling out once more than five message wait for processing in the queue.
Deploy the example application to Azure🔗
Now it’s time to deploy the sample application to Azure. Find the deploy.sh script in the sample folder. The script itself is straightforward. It creates a new Azure Resource Group and starts the infrastructure deployment using az deployment group create.
# Start deployment
./deploy.sh

# Creates a new Azure Resource Group
# Deploys everything into the new Azure Resource Group
# Prints the public API endpoint to the terminal once deployment has finished
https://api.lemontree-12345678.northeurope.azurecontainerapps.io
Test the sample application🔗
Once the deployment has finished and everything is up and running in Azure Container Apps, we can put some load on the system using well-known tools like Postman, hey, bombardier, or cURL. The following snippet uses a $fqdn variable, set to the public API endpoint, which we receive due to the deploy.sh script. Alternatively, we can consult Azure Portal and grab the URL from the corresponding Azure Container App.
for i in {1..300}
do
  echo "Issuing call $i"
  curl -iX POST -D '{"message": "Hello, this is request no $i"}' $fqdn/store
done
Check application scaling behavior using Azure Metrics🔗
Having sent some requests to the public API of the sample application, we will see blobs appearing in the Azure Storage Account.
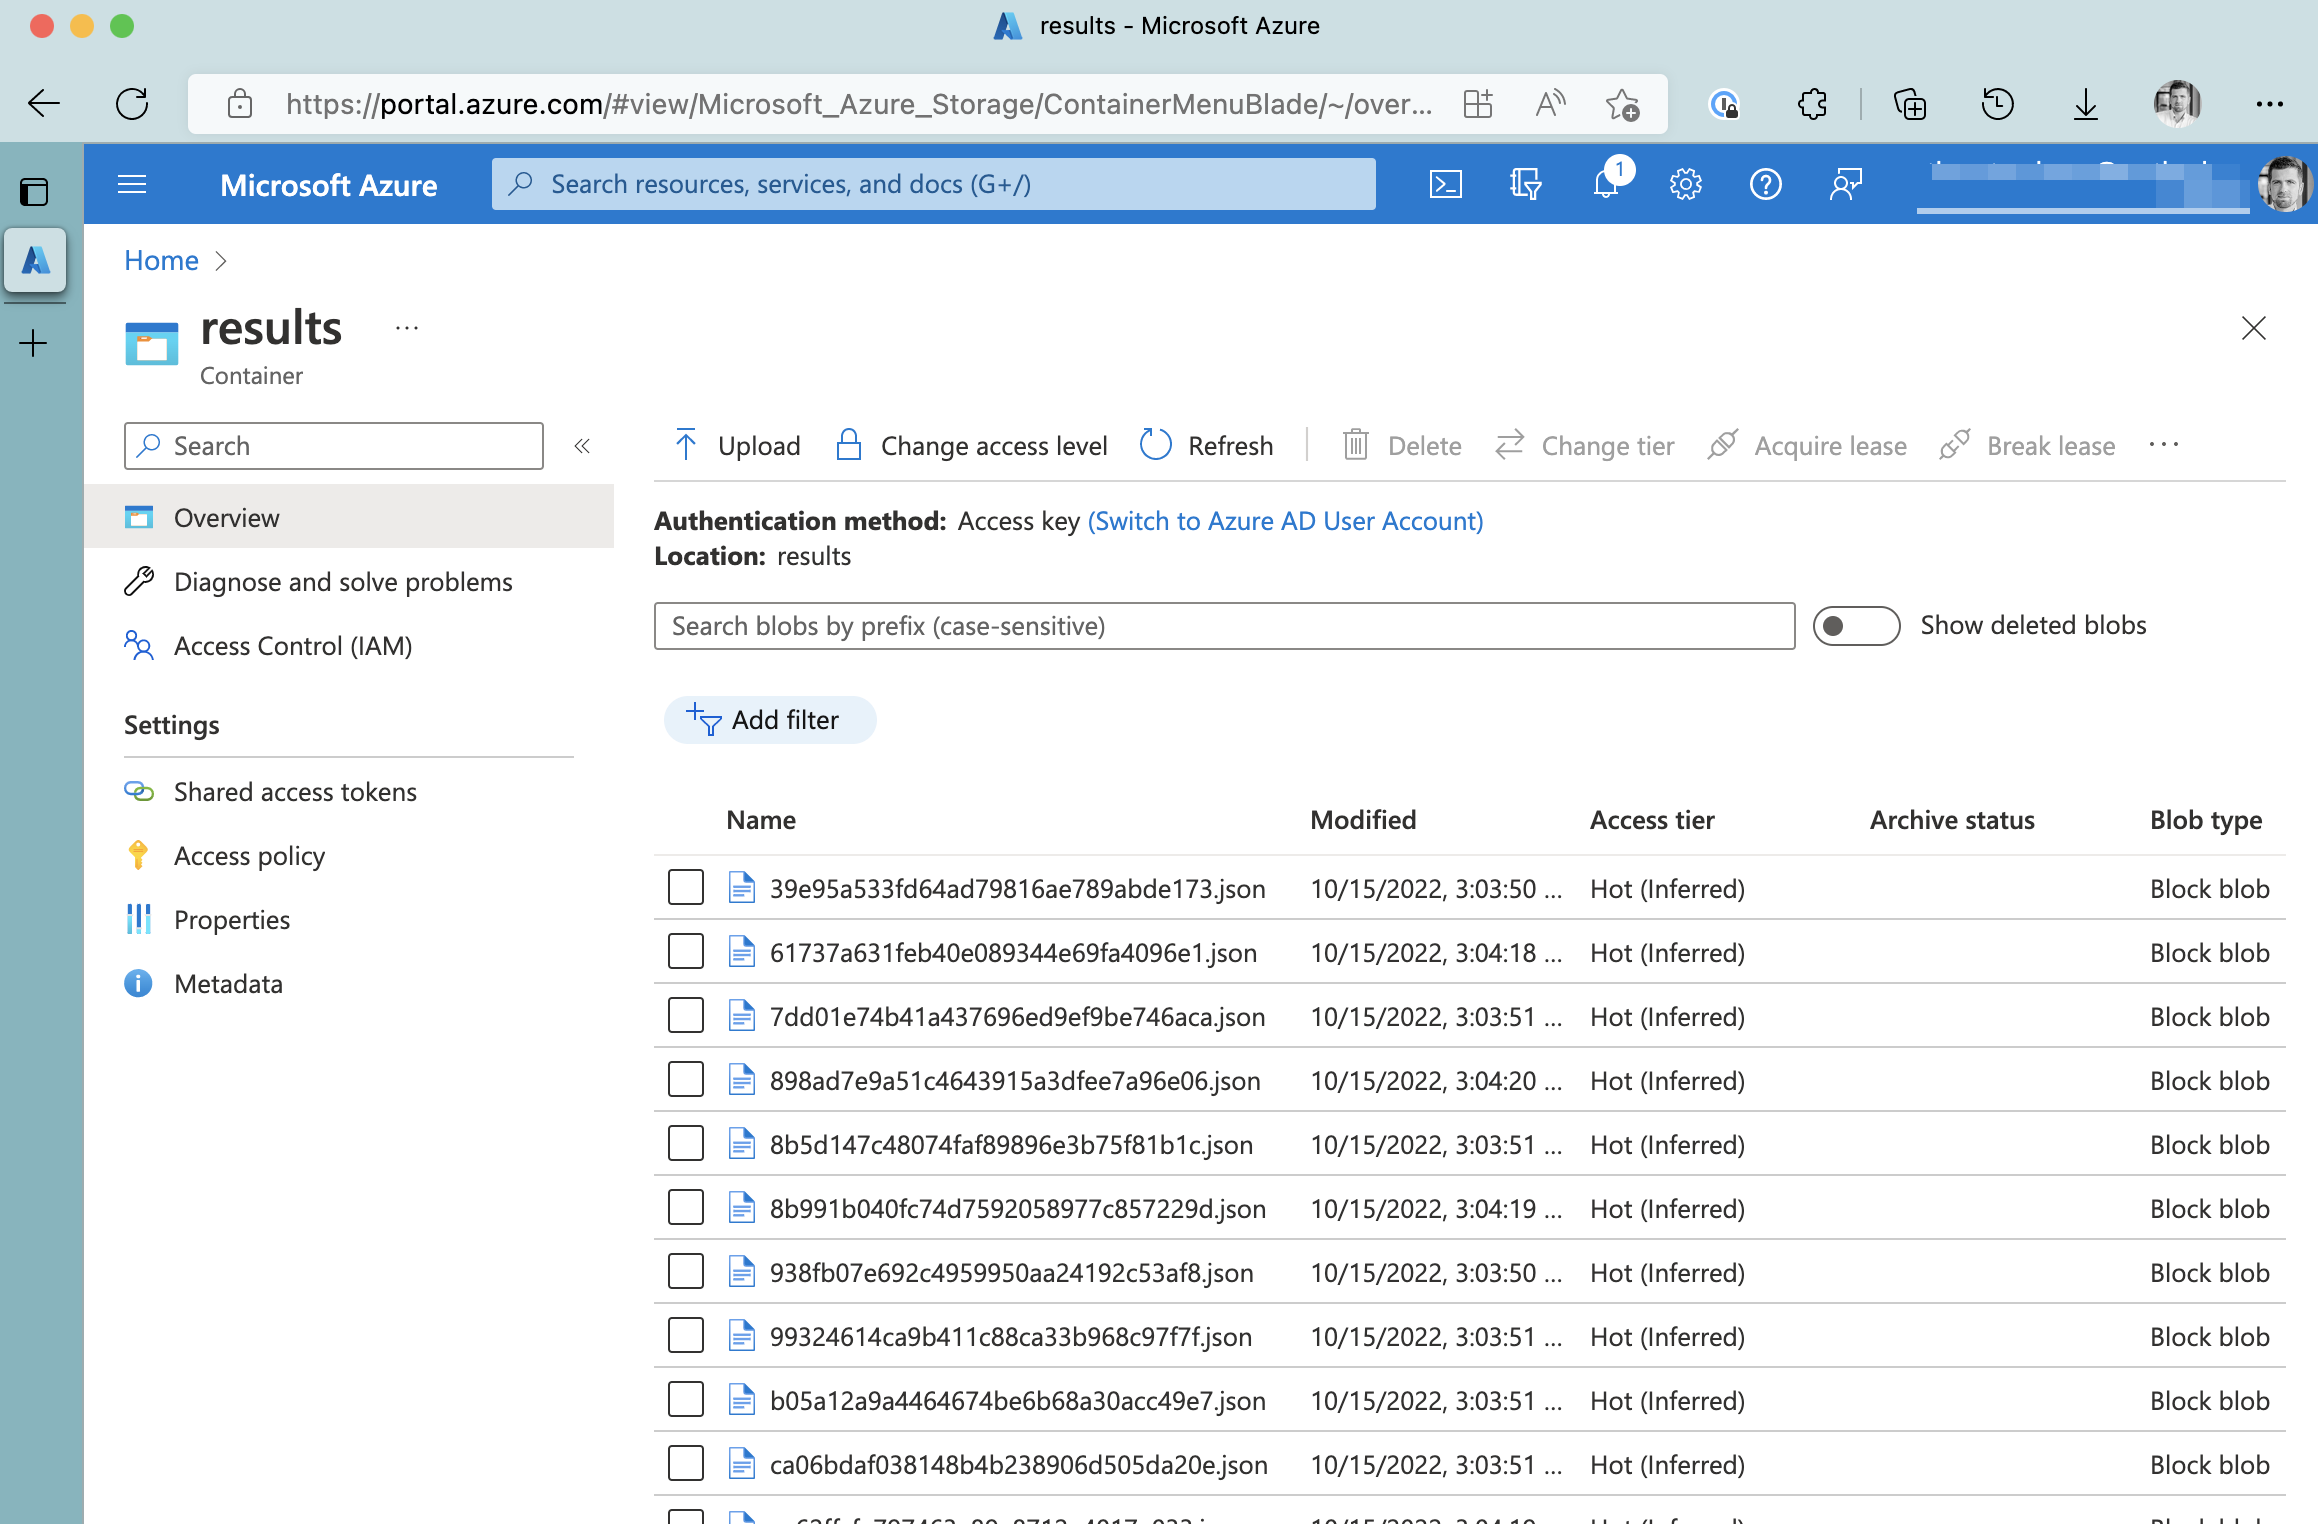
Generated blobs in Azure Storage Account
Although this proves our example working, it’s more interesting to see how KEDA scaled our background worker to deal with the actual load. Every Azure Container App pushes Metrics into the Azure Metrics Pipeline that we can consult to find essential information. One of the metrics exposed is the actual Replica Count.
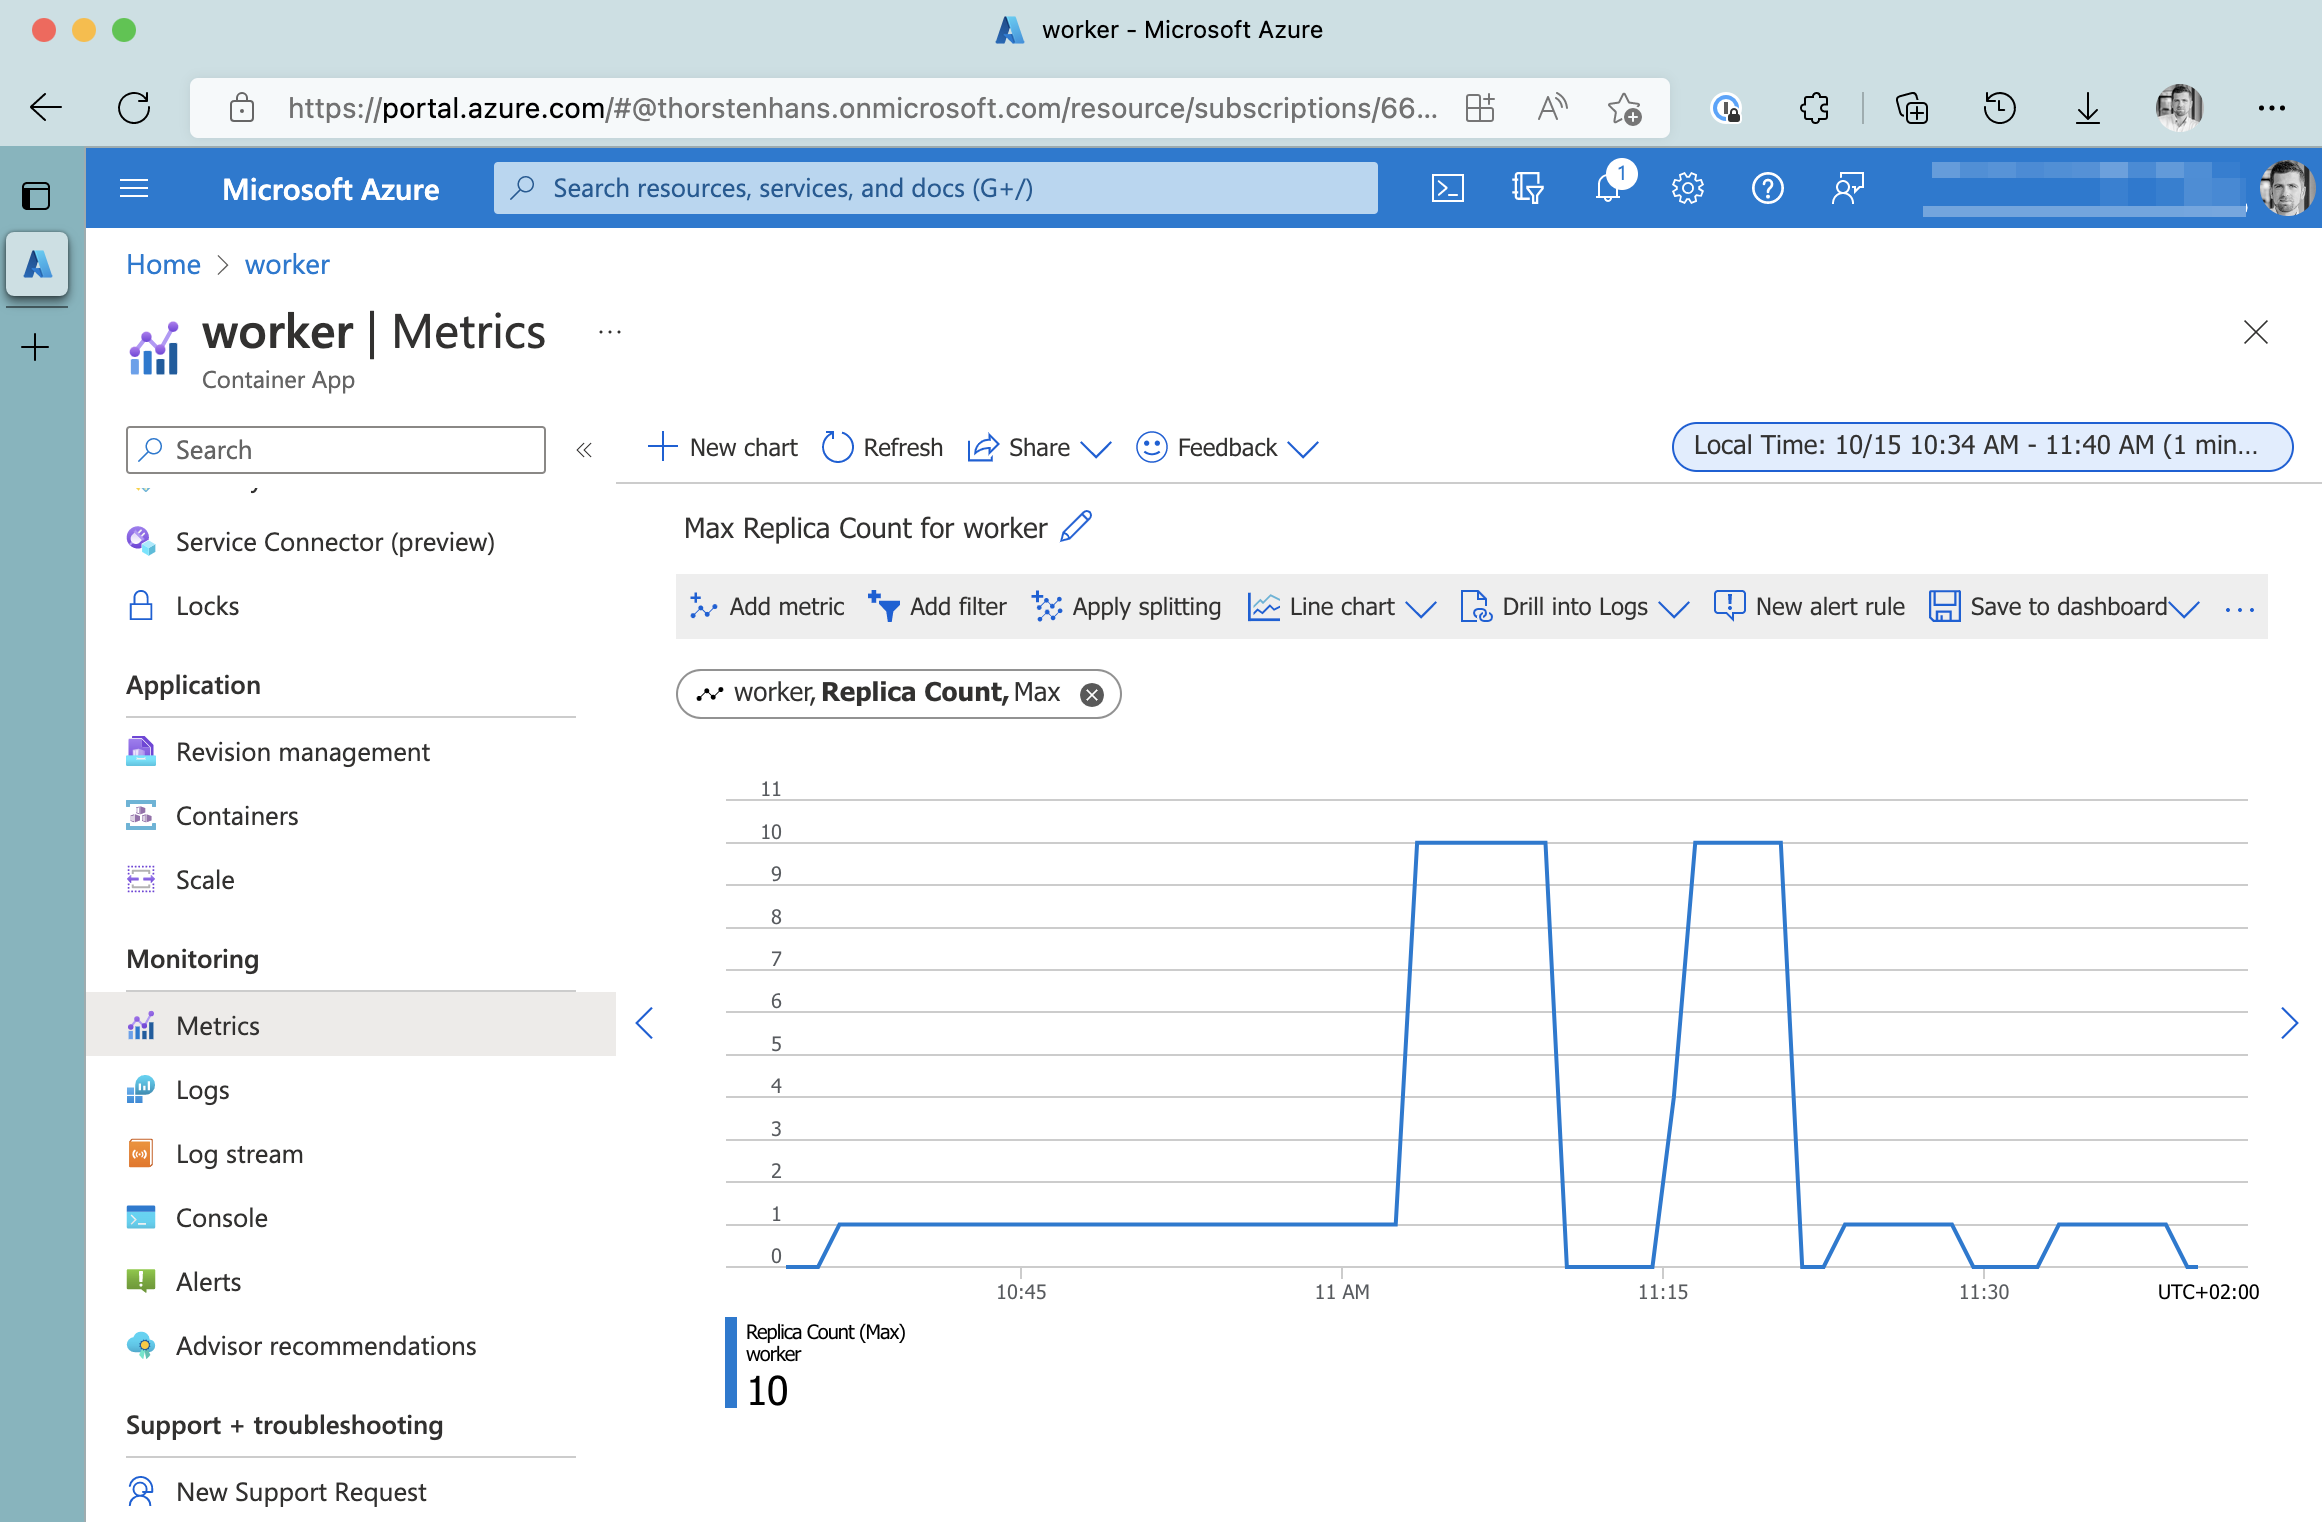
Azure Container Apps Relica-Count Metrics
As you can see, KEDA scaled the background worker up to the upper boundary when we put some pressure on the API endpoint. Azure Container Apps has a cooldown period of 5 minutes, meaning that the background worker gets scaled 5 minutes after the load is dropped.
What we’ve covered today🔗
Throughout the article, we’ve covered
- 💡 Learned what KEDA is and how it fits in cloud-native architectures
- 👷🏼 Crafted a Background Worker in .NET
- ↔️ Configured horizontal scaling for the Background Worker using the KEDA scaler for Azure Service Bus
- 📈 Tested our application by putting some load on the system and verified horizontal scaling behavior of the Background Worker
Conclusion🔗
Background workers are a critical part of almost every distributed system. As we discovered in this article, we can scale background workers dynamically using the scalers provided by KEDA.
Although KEDA itself is often demonstrated in combination with Azure Functions, we don’t have to adopt the “programming model” dictated by Azure Functions to use KEDA.