Managed Identities With Azure Container Apps
Yesterday (13th of April 2022), we saw a couple of new features appearing in Azure Container Apps (ACA). This article will use managed identities with Azure Container Apps, which allows us to authenticate and rely on Role-Based Access Control (RBAC) when interacting with other Azure services. Before we dive into using managed identities in Azure Container Apps, let’s do a quick refresher about managed identities to bring everyone on track.
- Managed identities in Azure
- Managed identities in Azure Container Apps
- Specifying managed identities in Azure Container Apps
- The sample application
- Provision dependent infrastructure with Bicep
- Authenticate Azure SDK using an MSI
- Build and push application container image
- Deploy to Azure Container Apps
- Test the sample application
- Conclusion
Managed identities in Azure🔗
In Azure, we can use a managed identity (MSI) to access other Azure services protected by Azure Active Directory (AzureAD). We don’t have to use sensitive values like connection strings or keys when accessing other Azure services with managed identities. Instead, we configure RBAC and allow our MSI to perform several actions on different scopes. Azure offers two different types of managed identities that are explained in the following paragraphs:
System assigned managed identities🔗
System-assigned identities are generated and managed by Azure itself. They always belong to a particular Azure service and are bound to the lifetime of that service. When you destroy the Azure resource, the underlying system-assigned managed identity is also destroyed
User assigned managed identities🔗
In contrast, you create and manage user-assigned managed identities - like any other resource in Azure - on your own. They are not tied to the lifetime of another Azure resource. You can assign a single user-assigned identity to multiple Azure services. User-assigned identities are not deleted by Azure when you remove an Azure resource with that particular identity assigned. You’ve to delete the user-assigned identity on your own.
Managed identities in Azure Container Apps🔗
As mentioned in the introduction, we can use MSIs in Azure Container Apps starting on the 13th of April 2022. Containers running in Azure Container Apps can now call into dependent Azure Services using a managed identity instead of relying on connection strings or keys when it comes to authentication.
Limitations as of April 2022🔗
Currently, there are two limitations in the context of using managed identities in Azure Container Apps
- Assigned managed identities can’t be used to pull container images from Azure Container Registry (ACR) 😭
- Assigned managed identities can’t be used when defining scaling rules (KEDA) or within the Dapr component configuration. (We still have to provide keys or connection strings for those scenarios)
Specifying managed identities in Azure Container Apps🔗
As of now, we can configure managed identities in the context of Azure Container Apps either using Bicep or using Azure CLI. Managed identities are specified on the scope of the Container App so that we can use different identities for different Pods (sorry for the Kubernetes hint). Azure Container Apps supports three different managed identity configurations:
- system-assigned managed identity
- user-assigned managed identities
- system and user-assigned identities
Specifying managed identities in Bicep🔗
As for many other Azure resources, the Azure Container Apps team added the top-level identity property. Which we can use to configure managed identities according to our needs:
// cut off to minimize snippets
// System assigned MSI
identity: {
  type: 'SystemAssigned'
}

// cut off to minimize snippets
// User assigned MSI
identity: {
  type: 'UserAssigned'
  userAssignedIdentities: {
    '<msi_1_id>': {}
    '<msi_2_id>': {}
  }
}

// cut off to minimize snippets
// System AND user assigned MSI
identity: {
  type: 'SystemAssigned,UserAssigned'
  userAssignedIdentities: {
    '<msi_1_id>': {}
    '<msi_2_id>': {}
  }
}
Specifying managed identities with Azure CLI🔗
With Azure CLI, we can also assign managed identities to existing Azure Container Apps without re-deploying the application. However, when you enable an MSI on an existing Azure Container App, you have to deploy a new revision to have the service pick up the MSI
# System assigned MSI
az containerapp identity assign -n existing -g rg-some --system-assigned

# User assigned MSI
az containerapp identity assign -n existing -g rg-some --user-assigned <msi_1_id>
The sample application🔗
For the sake of this article, we will create a small application that will expose the names of blobs stored in Azure Blob Storage via HTTP. Instead of hard-coding the connection between our app and the Azure Storage Account, we will call into Azure App Configuration to receive the name of the desired storage account. We use a user-assigned managed identity to authenticate with both services (storage account and app configuration) in this scenario. On top of that, fine granular RBAC ensures that our code is just able to read data in those services. We’ll configure our ACR instance with token authentication because we can’t use managed identities to pull container images from ACR (yet). (Enabling the admin account would also work. However, it is a bad practice).
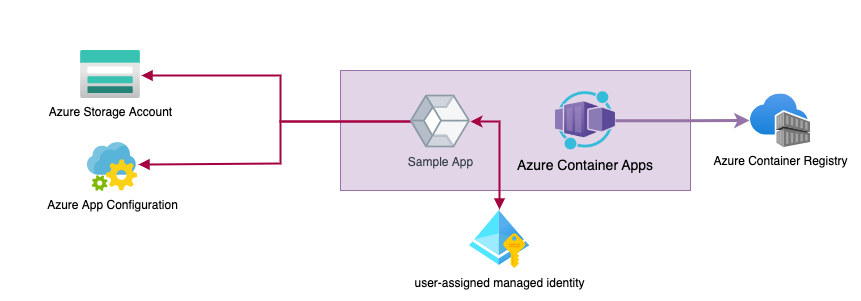
The sample application leveraging managed service identity
Clone the sample repository from GitHub🔗
All my Azure Container Apps samples are located in a single repository on GitHub. The example for this post is located in the sub-folder 007-managed-identities. Let’s quickly clone the repository, so you can check mentioned parts locally before finally hitting the deploy button 😄.
# Navigate to your source directory
cd ~/dev

# Clone the repository
git clone [email protected]:ThorstenHans/azure-container-apps-samples.git

# Move to the sample folder
cd azure-container-apps-samples/007-managed-identities

# Fire up Visual Studio Code
code .
Provision dependent infrastructure with Bicep🔗
Our application relies on dependencies such as Azure Storage Account, Azure Container Registry, Azure App Configuration, and the user-assigned Managed Identity. Let’s spin up a new Azure Resource Group and deploy them using Azure CLI.
# Ensure you're located in the proper samples folder
cd ~/dev/azure-container-apps-samples/007-managed-identities

# Variables
loc=northeurope
rgName=rg-aca-msi-sample
saName=saacamsisample
containerName=blobs
acrName=acamsisample
appCfgName=appcfg-aca-msi

# Create the Azure Resource Group
az group create -n $rgName -l $loc

# Create the Azure Storage Account
saId=$(az storage account create -n $saName -g $rgName --sku Standard_LRS --kind StorageV2 --query "id" -otsv)

# Grab Account Key
saKey=$(az storage account keys list -n $saName --query "[0].value" -otsv)

# Create Blob Container
az storage container create -n $containerName --account-name $saName --account-key $saKey

# Upload Sample Blobs
az storage blob upload -f ./sample-blobs/blob1.txt -c blobs --account-name $saName --account-key $saKey
az storage blob upload -f ./sample-blobs/blob2.json -c blobs --account-name $saName --account-key $saKey

# Create the Azure App Configuration
appCfgId=$(az appconfig create -g $rgName -n $appCfgName -l $loc --query "id" -otsv)
appCfgName=$(az appconfig show -g aca-msi-sample -n appcfg-aca-msi --query "name" -otsv)

# Store Storage Account name and container name in Azure App Configuration
az appconfig kv set -n $appCfgName --key sotrage_account_name --value $saName --yes -onone
az appconfig kv set -n $appCfgName --key blob_container_name --value $containerName --yes -onone

# Create the Azure Container Registry
az acr create -n $acrName -g $rgName --sku Premium --admin-enabled false -onone

# Create an ACR Token
az acr token create -n acaPull -r $acrName --scope-map _repositories_pull --status enabled -onone

# Generate a password for the ACR token
acrTokenPassword=$(az acr token credential generate -n acaPull \
 -r $acrName --expiration-in-days 14 \
 --password1 --query "passwords[0].value" -otsv)

# Create a user-assigned MSI
msiId=$(az identity create -n id-aca -g $rgName -l $loc --query "id" -otsv)
msiClientId=$(az identity show -n id-aca -g $rgName --query "clientId" -otsv)

# Create role assignments for the user-assigned MSI
az role assignment create --scope $appCfgId --assignee $msiId --role "App Configuration Data Reader" -onone
az role assignment create --scope $saId --assignee $msiId --role "Storage Blob Data Reader" -onone
Authenticate Azure SDK using an MSI🔗
The actual code of the sample API is pretty straightforward. It leverages the Azure SDK for .NET for calling into the Azure Storage Account and Azure App Configuration. To authenticate using our MSI, we use Azure.Identity, which can be added to any .NET project using dotnet add package Azure.Identity.
Read configuration values from Azure App Configuration🔗
To read both storage_account_name and container_name from Azure App Configuration, we have to install Azure.Data.AppConfiguration (dotnet add package Azure.Data.AppConfiguration). Once the package is installed, we can authenticate and read configuration values. AZ_APPCFG_ENDPOINT will be set by Bicep when deploying the application to Azure Container Apps.
using Azure.Identity;
using Azure.Data.AppConfiguration;
// cut off to minimize snippets

public IEnumerable<string> GetBlobNames(){

    string msiClientId = Configuration.GetValue<string>("MSI_CLIENT_ID");
    string appCfgEndpoint = Configuration.GetValue<string>("AZ_APPCFG_ENDPOINT");

    if (string.IsNullOrEmpty(msiClientId) || string.IsNullOrWhiteSpace(appCfgEndpoint)) {
        throw new ApplicationException("Please specify MSI_CLIENT_ID and AZ_APPCFG_ENDPOINT");
    }

    var appConfig = new ConfigurationClient(new Uri(appCfgEndpoint), new ManagedIdentityCredential(clientId: msiClientId));

    var accountName = appConfig.GetConfigurationSetting("storage_account_name").Value.Value;
    var containerName = appConfig.GetConfigurationSetting("container_name").Value.Value;

    // cut off to minimize snippets
}
Retrieve blobs from a particular container in Azure Storage Account🔗
To interact with Azure Blob Storage, we use Azure Storage SDK v12. We install it using dotnet add package Azure.Storage.Blobs. Again, authentication is done using Azure.Identity by providing a new instance of ManagedIdentityCredential.
using Azure.Identity;
using Azure.Storage.Blobs;
using Azure.Storage.Blobs.Models;

// cut off to minimize snippets
public IEnumerable<string> GetBlobNames()
{
    // read accountName and containerName using Azure App Configuration (see snippet above)
    // cut off to minimize snippets
    if (string.IsNullOrWhiteSpace(accountName) || string.IsNullOrWhiteSpace(containerName)){
        throw new ApplicationException("Could not locate Storage Account");
    }
    Uri accountUri = new Uri($"https://{accountName}.blob.core.windows.net/");

    var client = new BlobServiceClient(accountUri, new ManagedIdentityCredential(clientId: msiClientId));

    var containerClient = client.GetBlobContainerClient(containerName);
    var pager =containerClient.GetBlobs().AsPages(default, 10);

    var blobs = new List<string>();

    foreach (Azure.Page<BlobItem> blobPage in pager) {
        blobPage.Values.ToList().ForEach(b=>
        {
            blobs.Add($"{b.Name} - {b.Properties.ContentType} ({b.Properties.ContentLength} bytes)");
        });
    }
    return blobs;
}
Build and push application container image🔗
The sample folder also contains a Dockerfile, we will use the Docker-CLI (docker) to build and push the container image to our ACR instance:
# Navigate to the src folder
cd ~/dev/azure-container-apps-samples/007-managed-identities/src

# Build the container image
docker build . -t acamsisample.azurecr.io/api:0.0.1

# Authenticate with ACR
az acr login -n acamsisample

# Push the container image
docker push acamsisample.azurecr.io/api:0.0.1
Deploy to Azure Container Apps🔗
The Bicep module for deploying to Azure Container Apps consists of three main components:
- Azure Log Analytics Workspace
- Azure Container App Environment
- Azure Container App
For the sake of this article, the most interesting part is linking our user-assigned managed identity to the container app. This is done in bicep/modules/container-app.bicep as shown in the following snippet:
param location string = resourceGroup().location
param name string
param containerAppEnvironmentId string

param containerImage string
param useExternalIngress bool = false
param containerPort int

param envVars array = []

param acrName string
param acrTokenName string
@secure()
param acrTokenPassword string

param identityId string

resource containerApp 'Microsoft.App/containerApps@2022-01-01-preview' = {
  name: name
  location: location
  identity: {
    type: 'UserAssigned'
    userAssignedIdentities: {
      '${identityId}': {}
    }
  }
  properties: {
        // cut off to minimize snippets
  }
}

output fqdn string = containerApp.properties.configuration.ingress.fqdn
The identityId parameter is passed from the main Bicep file (./bicep/main.bicep) into the sub-module. Whereas AZ_APPCFG_ENDPOINT and MSI_CLIENT_ID are provided as environment variables:
// cut off to minimize snippets
module containerApp 'modules/container-app.bicep' = {
    name: 'container-app'
    params: {
        name: 'storage-browser'
        location: location
        containerAppEnvironmentId: containerAppEnvironment.outputs.id
        containerImage: containerImage
        containerPort: containerPort
        acrName: acrName
        acrTokenName: acrTokenName
        acrTokenPassword: acrTokenPassword
        identityId: identityId
        envVars: [
            {
                name: 'AZ_APPCFG_ENDPOINT'
                value: appCfgEndpoint
            }
            {
                name: 'MSI_CLIENT_ID'
                value: identityClientId
            }
        ]
        useExternalIngress: true
    }
}
Actual deployment with Bicep🔗
Now that everything is in place, we can finally deploy the sample application to Azure Container Apps. Again, we will use Bicep to do so:
# Ensure being in the sample folder
cd ~/source/azure-container-apps-samples/007-managed-identities

# Deploy to Azure Container Apps
fqdn=$(az deployment group create -g $rgName -f ./bicep/main.bicep \
 --parameters \
  acrName=$acrName \
  acrTokenPassword=$acrTokenPassword \
  acrTokenName=acaPull\
  identityId=$msiId \
  identityClientId=$msiClientId \
 --query "properties.outputs.fqdn.value" -otsv)
Test the sample application🔗
What’s the best UI for testing an API???
Yes! It’s curl 💪🏼. Fire up a terminal and give our sample API a try:
curl -X GET $fqdn/blobs | jq

[
 "blob1.txt - text/plain (1776 bytes)",
 "blob2.json - application/json (6931 bytes)"
]
Or, you can navigate the sample running in Azure Container apps using the browser of your choice
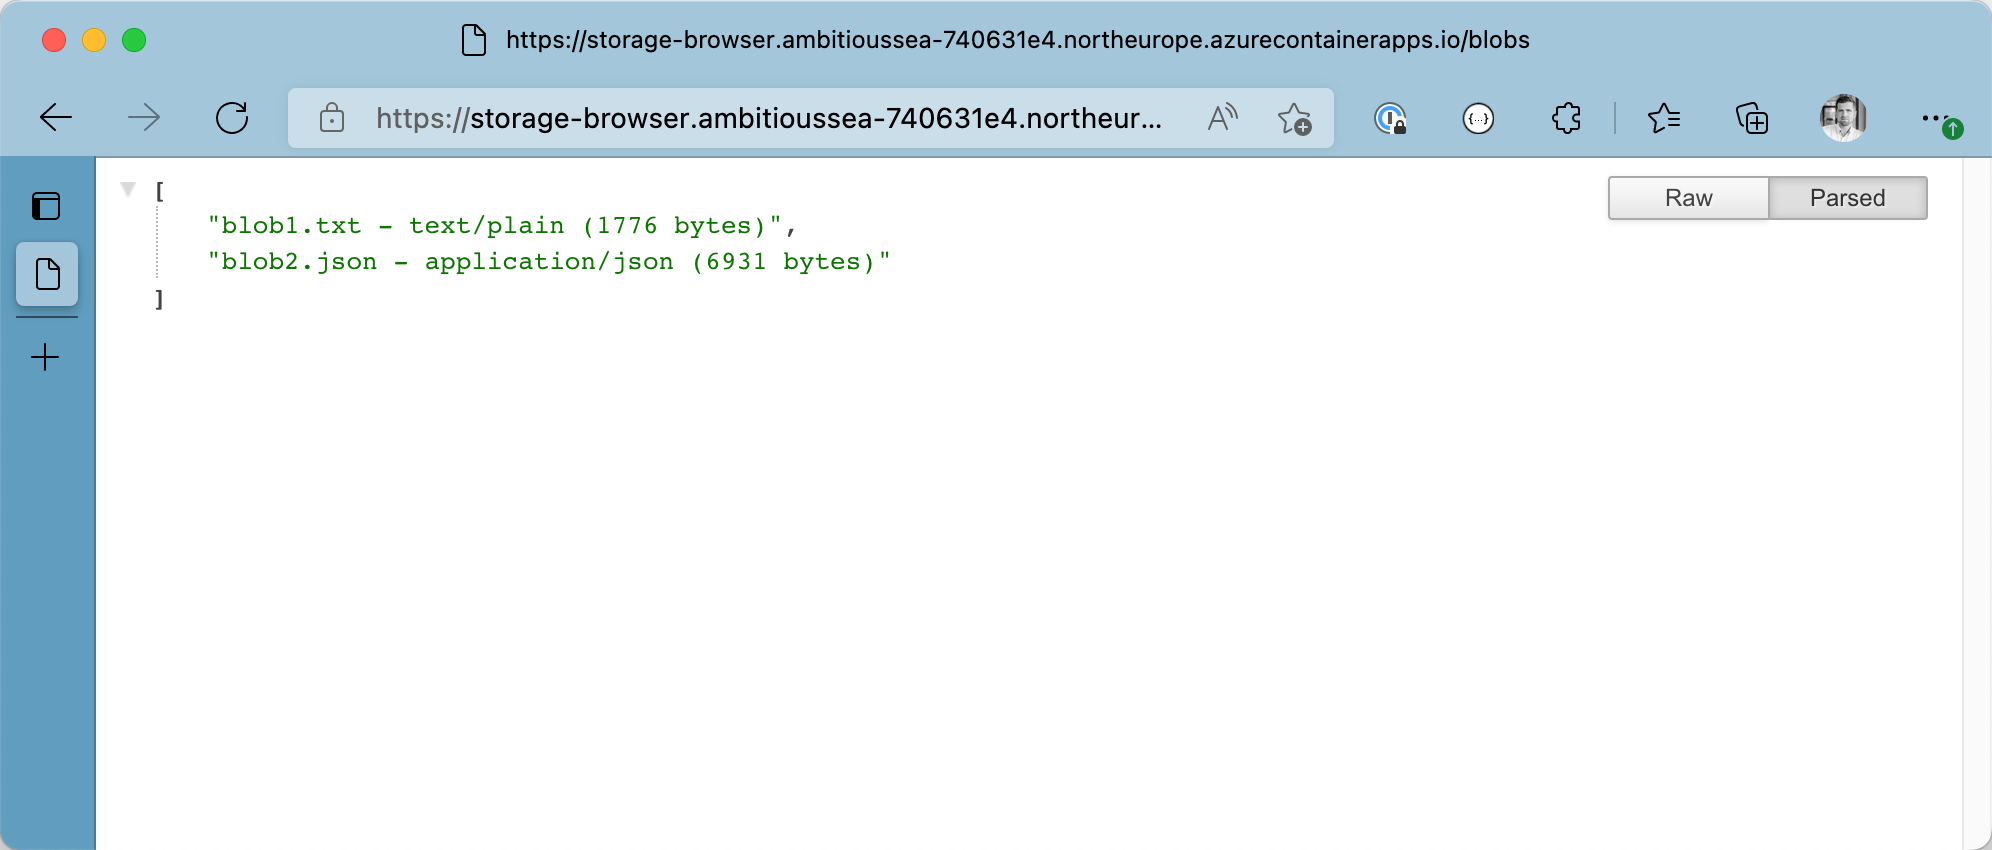
Blob Information - retrieved in Azure Container Apps w/ user-assigned managed identity
Conclusion🔗
Supporting managed identities in Azure Container Apps was perhaps the most requested feature in the past months. Although the services are still in preview, we saw a couple of new features rolled out globally these days. Now that managed identities have landed in Azure Container Apps. We can use both system and user-assigned MSIs (even the mix of both is possible). That said, we can now write password-less code, also when running in Azure Container Apps.
Supporting managed identities is an excellent addition to the overall service capabilities!
Personally, I hope to see support for managed identities to pull images from protected ACR instances soon. With that in place, we could get rid of ACR credentials too.
What we covered today🔗
- 💡Revisited managed identities in Azure
- 👀Saw how to link a managed identity to an Azure Container App in Bicep and Azure CLI
- ⚡️Provisioned a sample application that leverages user-assigned managed identity in Azure Container Apps
- 🖥 Used
curlto test our sample application