Send a Microsoft Teams message when new OCI artifacts appear in Azure Container Registry
Getting instant feedback when a new artifact is published in a container registry such as Azure Container Registry (ACR) is important. Everyone has to stay in the loop, especially when working in a large team and managing many containerized applications. By leveraging ACR webhooks and the Microsoft Teams Inbound Webhook connector, you can easily send custom messages to a team for different activities happening in your container registry.
This article guides you through connecting ACR with Microsoft Teams to send messages automatically to a specific team when a new version of an image or an OCI compliant artifact is pushed to ACR.
Architecture🔗
Before diving into building the actual solution, let’s take a look at the overall architecture. In ACR, we can configure webhooks to inform the outer world about different registry actions. On the other hand, Microsoft Teams offers an Inbound Webhook connector that we can leverage to send custom messages to the desired team.
As the architectural diagram shows, an Azure Functions app is used between both services to translate the payload received from the ACR webhook. It’s also the custom function, which will call into Microsoft Teams to create the custom message.
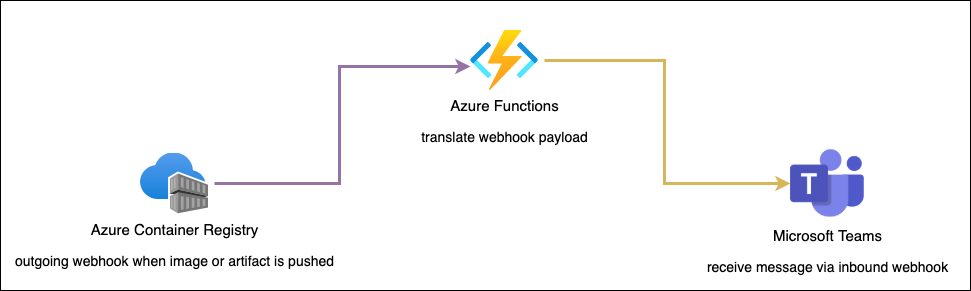
Azure Container Registry - Microsoft Teams integration architecture
Provision Azure Infrastructure🔗
When reading this article, the chances are good that you already have an ACR instance. However, I created a small script that you can customize to meet your naming conventions and spin up all required things in Azure. The script above is built using Azure CLI. If you have not installed Azure CLI yet, consult the detailed installation instructions.
Configure incoming Webhook in Microsoft Teams🔗
To send messages into Microsoft Teams, an Incoming Webhook is required. To create and configure a new Incoming Webhook, navigate to the desired team and select CONNECTORS from the Options Menu.
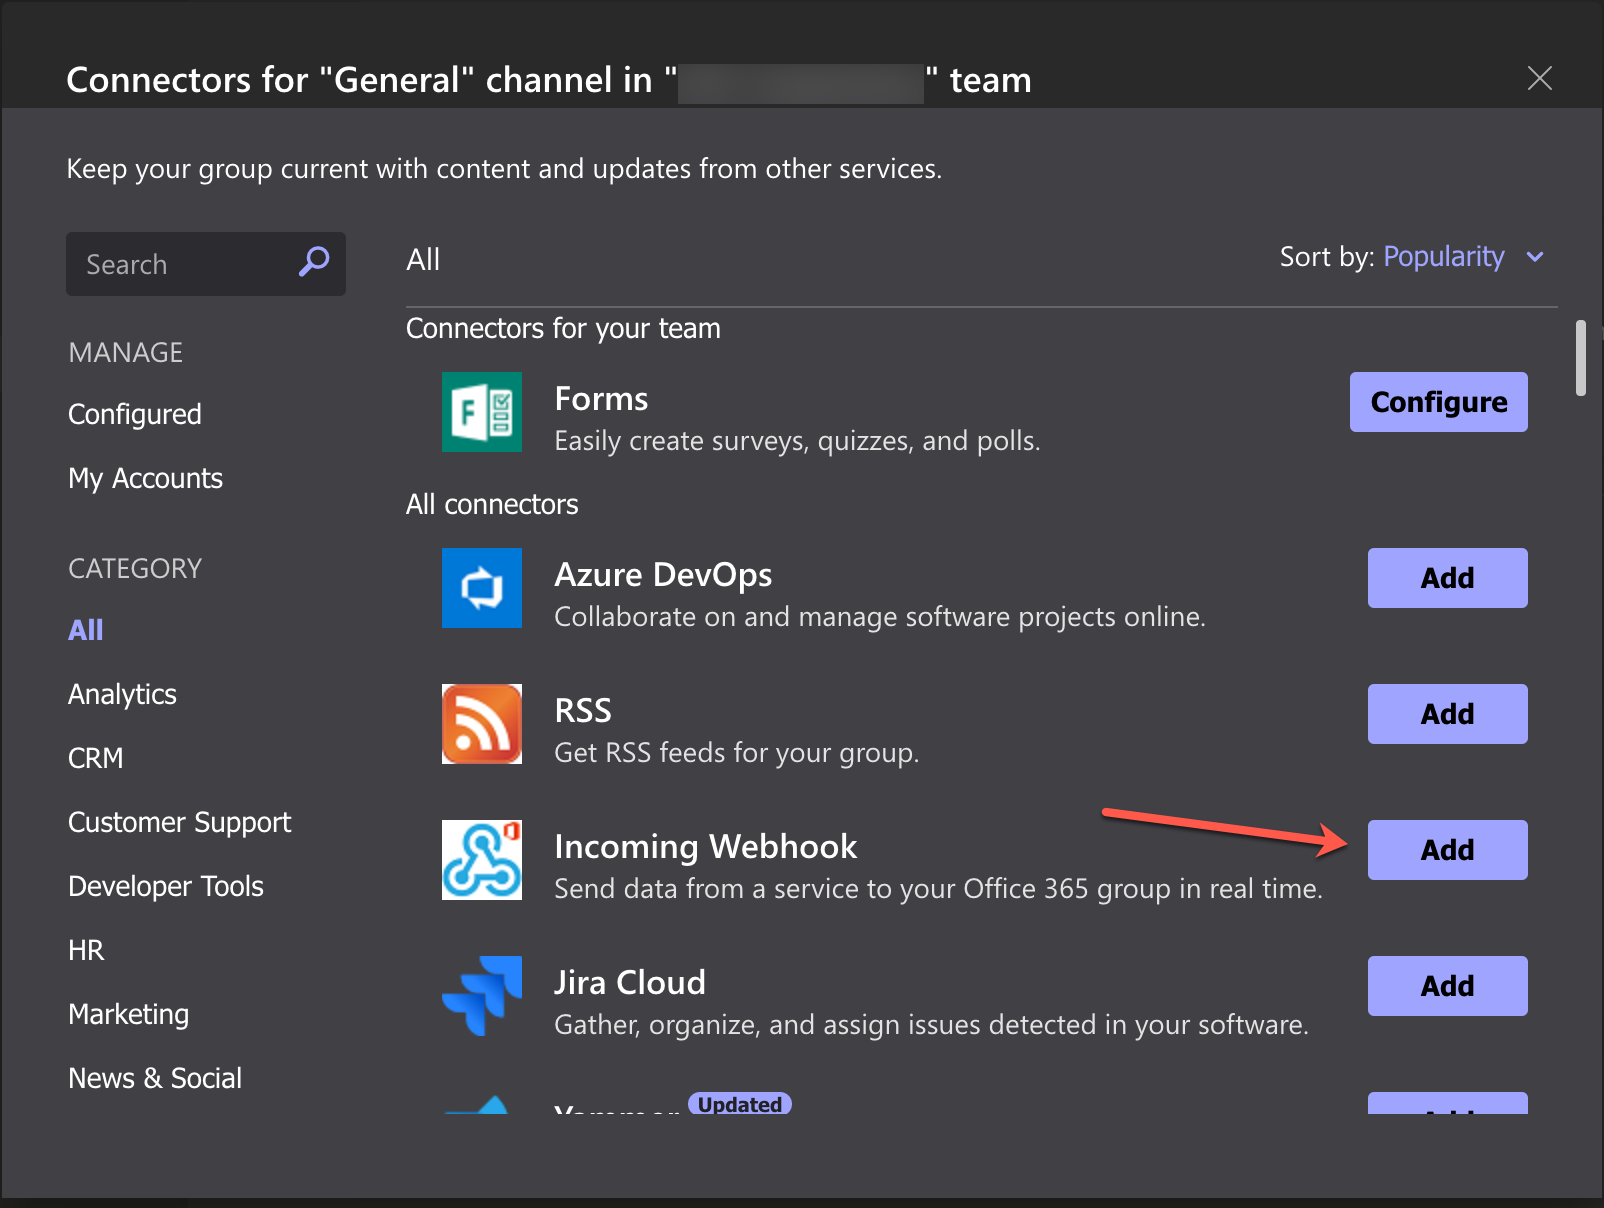
Add Incoming Webhook in Microsoft Teams
Microsoft Teams will present a massive list of connectors. Look for Incoming Webhook, and ADD it. Once added, the Incoming Webhook must be configured. I used the official ACR logo for demonstration purposes and set the name to “Azure Container Registry”.
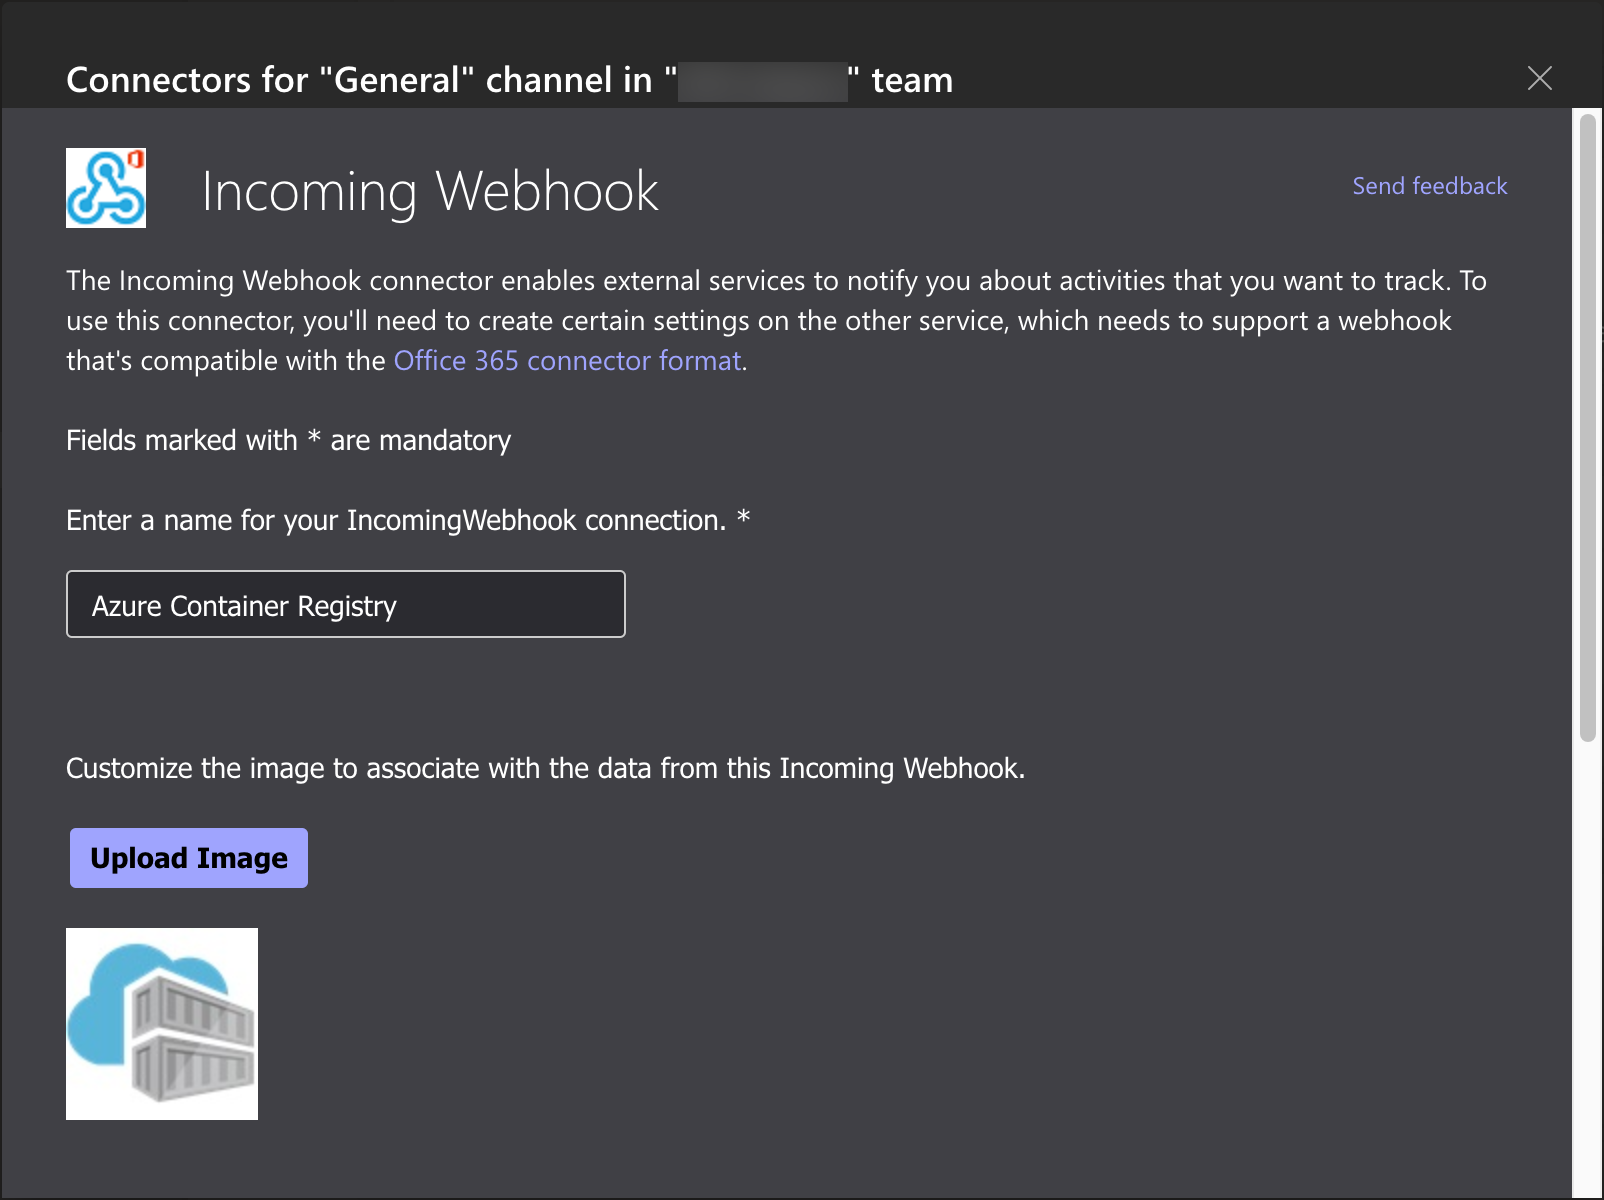
Configure Incoming Webhook in Microsoft Teams
Add Webhook URL to the Azure Functions app🔗
Having the Incoming Webhook connector configured in Microsoft Teams, you must store the webhook URL on the Azure Functions app. Again, use Azure CLI to get this done:
# Variables
FUNCTION_APP_NAME=fnapp-acr-teams
RESOURCE_GROUP_NAME=rg-acr-teams
WEBHOOK_URL=<your webhook url provided by Microsoft Teams>

# Set appSettings on Azure Functions App
az functionapp config appsettings set \
  -n $FUNCTION_APP_NAME \
  -g $RESOURCE_GROUP_NAME \
  --settings "ContainerRegistryTeams__TeamsWebhookUrl=$WEBHOOK_URL"
Implement Azure Functions🔗
Let’s write some code 🎉.
I’m a kind of CLI-addicted. That said, I use Azure Functions Core Tools (func) to get everything done when it comes to Azure Functions. If you are more on the UI side of things, use your preferred IDE or editor to create a new Azure Functions project.
# Create a project dir
mkdir -p ~/projects/acr-teams-integration
cd ~/projects/acr-teams-integration

# Create an Azure Functions project
func init --worker-runtime dotnet

# Create a new function
func new -l csharp --template "Http Trigger" \
  -n FnNotifyTeams -a function
To use dependency injection (DI) and configuration capabilities from .NET in an Azure Functions project, you have to install the following NuGet packages:
dotnet add package Microsoft.NET.Sdk.Functions
dotnet add package Microsoft.Azure.Functions.Extensions
dotnet add package Microsoft.Extensions.DependencyInjection
Add a custom FunctionsStartup class🔗
If you want to use IOptions<T> to access configuration data using strongly type C# classes, consider adding a custom implementation of FunctionsStartup as shown here:
[assembly: FunctionsStartup(typeof(Thns.Functions.Startup))]
namespace Thns.Functions
{
    public class Startup: FunctionsStartup
    {
        public override void Configure(IFunctionsHostBuilder builder)
        {
            builder.Services.AddOptions<TeamsConfig>()
              .Configure<IConfiguration>((settings, configuration) =>
              {
                  configuration.GetSection("ContainerRegistryTeams")
                    .Bind(settings);
              });
        }
    }
}
The configuration for our function is pretty simple. It’s just the webhook URL. That said, the TeamsConfig class is simple:
public class TeamsConfig
{
    public string TeamsWebhookUrl { get; set; }
}
You can now use regular DI patterns to get the configuration data during a request:
public class FnNotifyTeams
{
    public FnNotifyTeams(IOptions<TeamsConfig> options)
    {
        Config = options.Value;
    }

    protected TeamsConfig Config { get; }

    // omitted
}
The FnNotifyTeams function🔗
Let’s implement our Azure function based on an HTTPTrigger now. The function is responsible for:
- Validating incoming requests from ACR
- Constructing the payload for the Microsoft Teams message
- Calling into the Microsoft Teams webhook
[FunctionName("FnNotifyTeams")]
public async Task<IActionResult> Run(
    [HttpTrigger(AuthorizationLevel.Function, "POST", Route = "images")] HttpRequest req, ILogger log)
{
    string body = await new StreamReader(req.Body).ReadToEndAsync();
    dynamic d = JsonConvert.DeserializeObject(body);
    string action = d?.action;

    if (action != "push" && action != "chart_push")
    {
        log.LogWarning($"Action {action} is not supported.");
        return new BadRequestResult();
    }
    var metadata = ImageMetadata.FromPayload(d);
    if(metadata == null)
    {
        log.LogWarning($"Received invalid request. Got {body}");
        return new BadRequestResult();
    }
    var message = new {
        Title = $"New Container Image published in ACR",
        Text = $"`{metadata.Repository}:{metadata.Tag}` has been published at `{metadata.Registry}`. You can pull it now using: {Environment.NewLine}`docker pull {metadata.Registry}/{metadata.Repository}:{metadata.Tag}{Environment.NewLine}`"
    };
    var h = new HttpClient();
    var content = new StringContent(JsonConvert.SerializeObject(message), Encoding.UTF8, "application/json");

    var r = await h.PostAsync(Config.TeamsWebhookUrl, content);
    if (r.IsSuccessStatusCode){
        return new OkResult();
    }
    log.LogError($"Teams response -> {r.StatusCode}: {r.ReasonPhrase}");
    return new StatusCodeResult(500);
}
The preceding code takes the raw payload received from ACR, extracts and validates essential metadata. Suppose all necessary information is available and ACR issued the call because of a push or chart_push action. In that case, the request payload for calling into Microsoft Teams is constructed and send using the HttpClient::PostAsync method.
I encapsulated inbound message validation mainly into the ImageMetadata class, as you can see here:
public class ImageMetadata
{
    public string Registry { get; private set; }
    public string Repository { get; private set; }
    public string Tag { get; private set; }

    public static ImageMetadata FromPayload(dynamic d)
    {
        string repository = d?.target?.repository;
        string tag = d?.target?.tag;
        string registry = d?.request?.host;
        if (string.IsNullOrWhiteSpace(repository) ||
            string.IsNullOrWhiteSpace(tag) ||
            string.IsNullOrWhiteSpace(registry))
        {
            return null;
        }
        return new ImageMetadata
        {
            Registry = registry,
            Repository = repository,
            Tag = tag,
        };
    }
}
It’s publishing-time 🚀 We have everything in place for our Azure Functions App. Let’s publish it to the cloud now:
# Variables
FUNCTION_APP_NAME=fnapp-acr-teams

# go to the functions directory
cd projects/acr-teams-integration

# deploy the current code to Azure Functions app
func azure functionapp publish $FUNCTION_APP_NAME -b local
Grab the Azure Function URL with the authentication key🔗
Now that the code is deployed to the Azure Functions app, you have to grab the function’s URL, including the function key used for authentication. Again you can do that straight from the command line using the func CLI:
# Variables
FUNCTION_APP_NAME=fnapp-acr-teams

# Grab function url with function key
func azure functionapp list-functions $FUNCTION_APP_NAME --show-keys
Copy the invoke URL from the output.
Add a Webhook to ACR🔗
Last but not least, we have to create a new outgoing webhook in ACR. At this point, we’re interested in two events exposed from ACR via webhook push and chart_push:
# Variables
FUNCTION_URL=<paste function app url including function-key>
ACR_NAME=acrteams2021

# create a webhook in ACR
az acr webhook create -n webhook-notify-teams \
    -r $ACR_NAME \
    --uri $FUNCTION_URL \
    --actions push chart_push
Test the integration of Azure Container Registry and Microsoft Teams🔗
You can use any Docker image or OCI compliant artifact to test the integration. I’ll use an alpine Linux container image as an example here:
# Variables
ACR_NAME=acrteams2021

docker pull alpine:latest
docker tag alpine:latest $ACR_NAME.azurecr.io/alpine:0.0.1

# Login to ACR
az acr login -n $ACR_NAME

# Push the container image to ACR
docker push $ACR_NAME.azurecr.io/alpine:0.0.1
And after a few seconds, you should see a message appearing in Microsoft Teams. 🚀
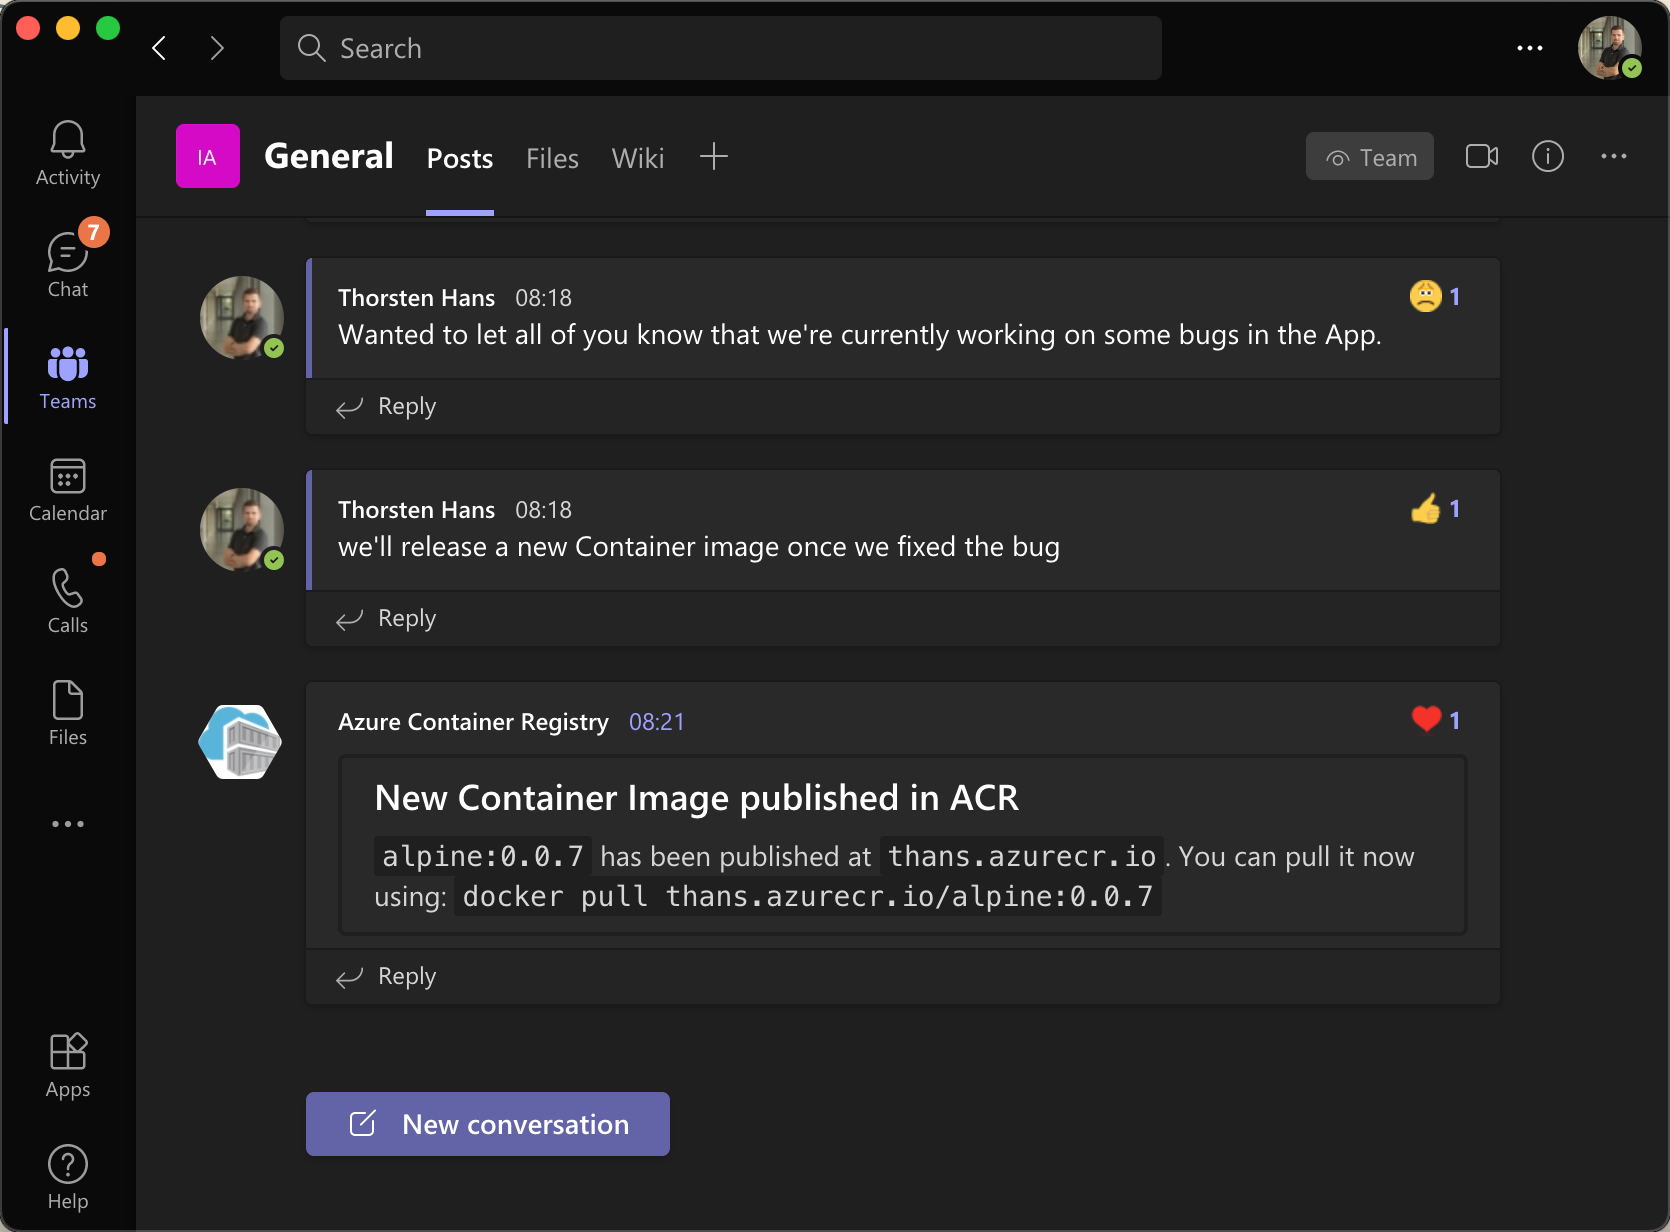
Custom message in Microsoft Teams
What you’ve learned🔗
Throughout this article, we have covered a lot, and you have successfully achieved the following goals 🚀:
- ✅ Configured an incoming webhook in Microsoft Teams
- ✅ Call into Microsoft Teams webhook from Azure Functions
- ✅ Transformed ACR webhook payload using Azure Functions
- ✅ Configured a custom ACR webhook
Conclusion🔗
Taking action based on certain things happening in the cloud is a great way to get feedback. Leveraging Azure Functions as the glue between the webhook producer (ACR) and Microsoft Teams as the target makes integrations like this one flexible yet robust.
The Incoming Webhook connector in Microsoft Teams also supports Office 365 connector cards and adaptive cards. Both message types offer deeper integration and allow customizations to create a tailored experience. You should consult the official documentation for further information.
Check out the GitHib repository for the source code.